Switch EC2 from Intel to AMD: Save 10% with Zero Code Changes


EPYC is just looking like the obvious choice here, unless you know for a fact that you are going to run one application, and one only, that is going to benefit from Intel’s Chip Design.
– Linus Sebastian, “Linus Tech Tips” – Intel’s New CPUs are Cringe – Intel Sapphire Rapids Platinum 8468.
Introduction
Driving from Rome to Milan to Genoa to Bergamo would take the better part of a day, and that is without mandatory stops for espresso and gelato. Unfortunately, today is not that day (although it’s on the list!) Instead, let’s take a trip through the world of AMD EPYC CPUs. The codenames for these chips are based on Italian cities – Naples, Milan, Rome, Genoa, Bergamo, etc. – and although our journey to cost savings will not be nearly as scenic or tasty as the real deal, it will help you significantly reduce your EC2 costs. Let’s hit the road.

Table of contents
- A brief history of EC2 Instances, and the introduction of AMD Instances
- Why AMD-powered processors are often more cost-effective than their Intel counterparts
- How to find and retype AMD instances
- Optimize EC2 instances for price and performance automatically with CloudFix
1. A brief history of EC2 instances
EC2 started with the m1.small instance type. These were powered by 2 cores of a 4 core Intel Xeon 5400 series processor. As EC2 grew in size and popularity, the number of instance options grew along with it. From the introduction of larger instances in 2007 to the compute-optimized c-series instances in 2008 and the memory optimized instances in May 2009, there has been a continuous stream of new instance types. In November 2018, the first AMD-based instances were introduced in the M5a and R5a instance types. That’s when things started to get interesting.
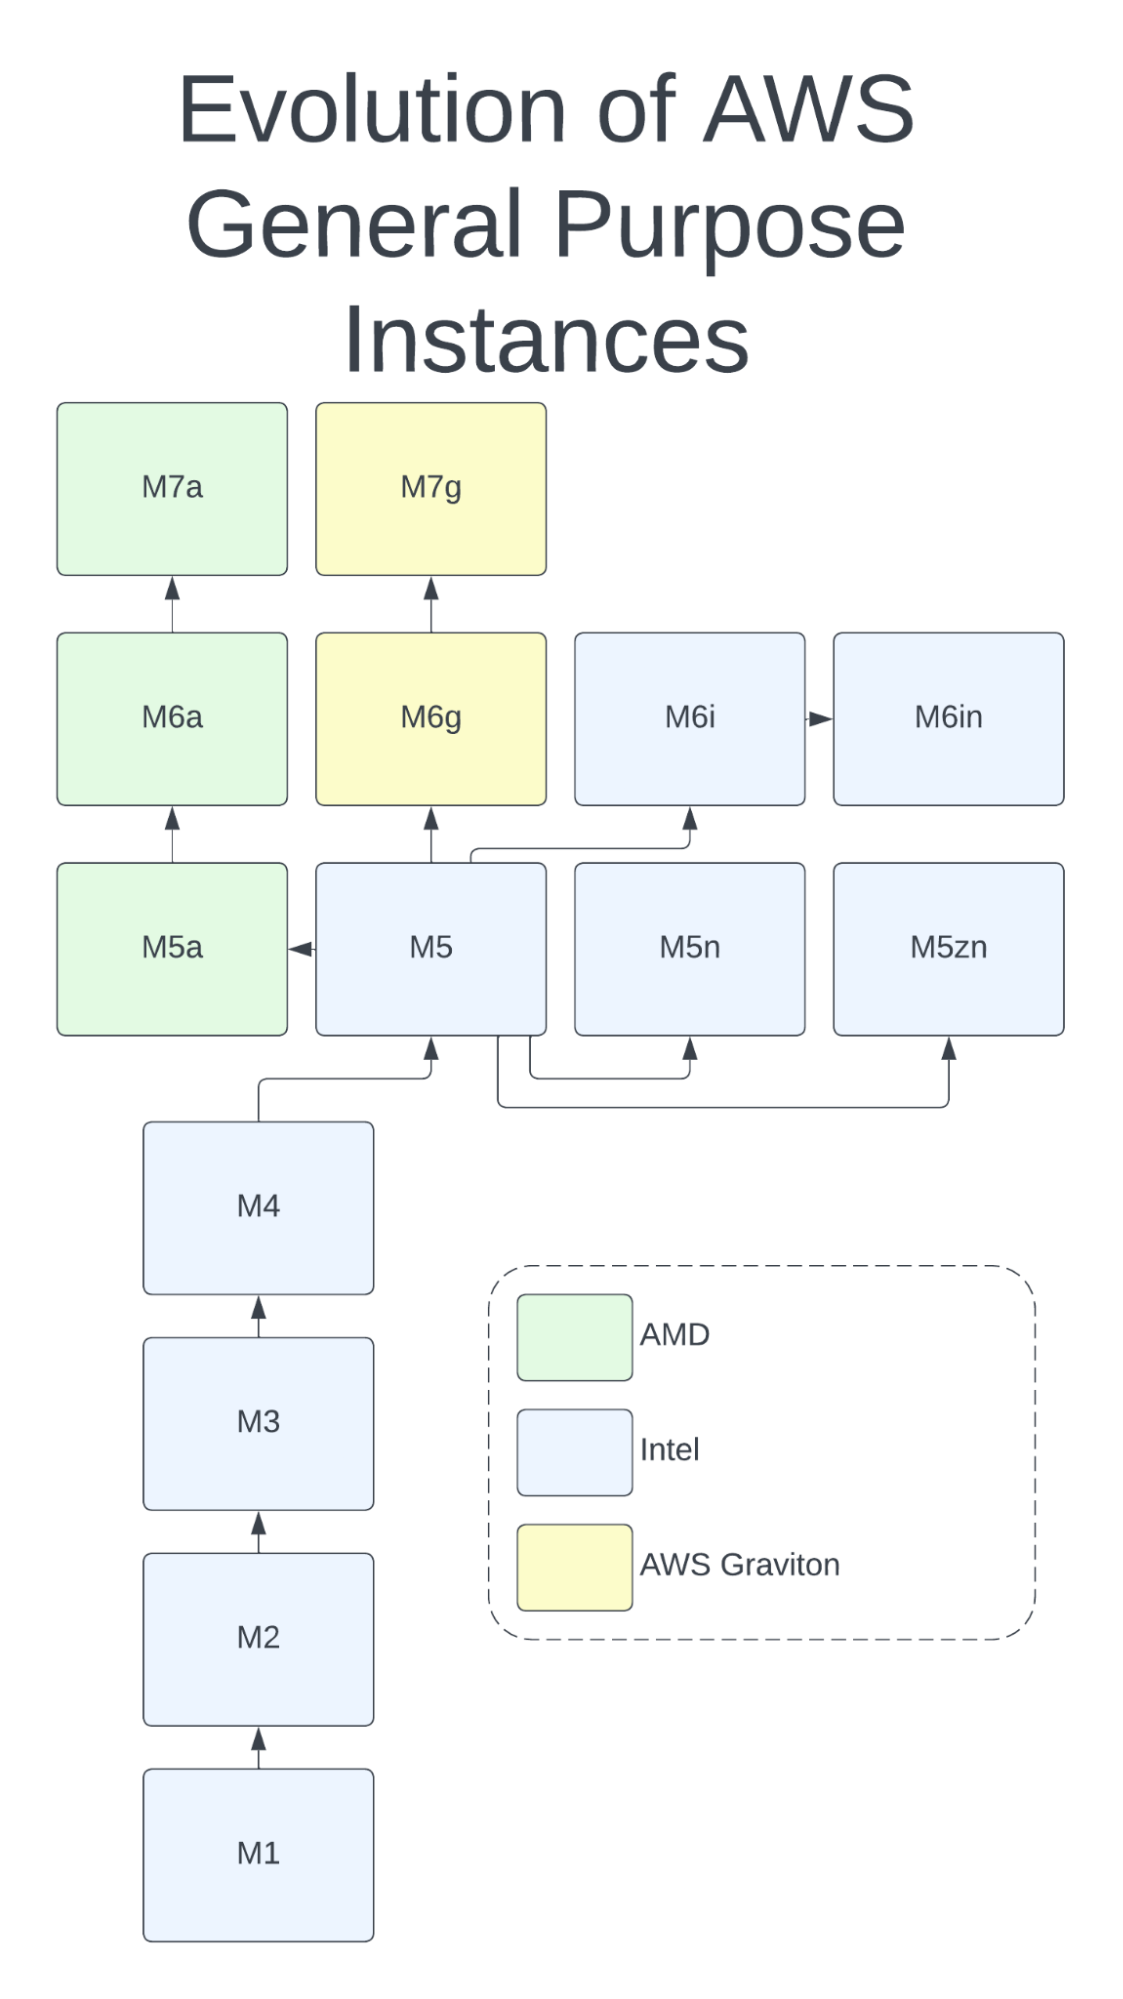
Evolution of the M (general purpose) instance family
For the first four generations of M series instances, there was only one choice: Intel-based instances. At generation 5, AMD introduced the M5a, along with the M5n and M5zn Intel-based instances. In the 6th generation, the AWS Graviton was added to the mix as the M6g, complementing the AMD-based M6a and the Intel-based M6i and M6in. And now, we can choose from 7th generation instances for the AWS Graviton (M7g) and the AMD EPYC-based M7a.
With each generation, the AMD CPU has come closer to matching the speed of its Intel counterpart. In fact, the AMD gen 3-powered M6a has a slightly higher clock speed than the Intel-based M6i, and the gen-4 powered M7a is faster yet. Fortunately, as AMD has improved the performance of its CPUs, it has also kept down costs. AWS users now have an incredible variety of choices in the server CPU space, as well as ample opportunity to optimize their choice of CPU and reduce their AWS spend.
Quick aside:
At CloudFix, we’re big fans of the AWS Graviton CPU (for instance, we recommend running OpenSearch on Graviton to save at least 10% compared to Intel x86 processors.) Like AMD processors, the AWS Graviton offers a lower cost alternative to the standard Intel offerings.
The Graviton differs from AMD processors in that it’s a different CPU architecture, Arm rather than x86. Many applications, such as those written in Python or Ruby, are happy to run on either architecture and there is little to no work involved when you switch between them. However, applications written in a lower level language and compiled into machine code, such as ffmpeg, will need to be compiled specifically for Arm. Even if there are Arm binaries available for your particular application, they may not be optimized to the same extent as their x86 equivalents. This can lead to large performance differences.
The takeaway here: Graviton may offer additional savings compared to Intel, but it’s a different CPU architecture, so switching requires more planning and testing. AMD, on the other hand, uses the same architecture as Intel, so it’s extremely easy to switch between them – and AMD’s lower cost x86 options are often more cost efficient at running real-world applications.
2. Why AMD-powered processors are often more cost-effective than their Intel counterparts
AMD and Intel. Like Pepsi and Coke, Uber and Lyft, Boeing and Airbus, even Alien vs. Predator, these great competitors are leaders in their industries. AMD, with its Ryzen (desktop and laptop), Threadripper PRO (workstation), and EPYC (server) lines, offers highly performant CPUs at a competitive price point. If you are a gamer, you are probably considering an AMD Ryzen 9 for your next build! In the cloud space, as we saw above, AMD has been partnering with AWS since 2018 to offer AMD-based EC2 instances.
The main advantage of the AMD instances is their price/performance, or how much compute you get per dollar spent? In previous generations of AMD processors, the calculus was complex. For example, comparing the Intel-based M5 vs the AMD-based M5a, the AMD processor is 2.5 Ghz vs 3.1 Ghz for the M5. However, this is far from the whole story. From the 2018 Jeff Barr blog post which introduced the M5a and R5a,
The newest EC2 instances are powered by custom AMD EPYC processors running at 2.5 GHz and are priced 10% lower than comparable instances. They are designed to be used for workloads that don’t use all of compute power available to them, and provide you with a new opportunity to optimize your instance mix based on cost and performance.
In other words, the loads processed by these instances are not going to be CPU-bound. If that was the case, it would have been a compute instance instead of general purpose. Comparing the specs of the M5 and M5a for the 12xlarge size:
|
Instance Size |
vCPU |
Clock Speed |
Memory (GiB) |
Instance Storage (GB) |
Network Bandwidth (Gbps)*** |
EBS Bandwidth (Mbps) |
Cost (us-east-1) |
|
m5a.12xlarge |
48 |
2.5 Ghz |
192 |
EBS-Only |
10 |
6,780 |
$2.064 |
|
m5.12xlarge |
48 |
Up to 3.1 Ghz |
192 |
EBS-Only |
12 |
9,500 |
$2.304 |
We notice that:
- The M5a is ~10% cheaper.
- vCPUs and Memory are equal.
- The Intel CPU is 20% faster, using Intel Turbo Boost (hence the “up to 3.1 Ghz”)
- The Intel instance has 20% more network bandwidth and 40% more EBS bandwidth.
What does this all mean when it comes to choosing the “best” instance type? Honestly, it depends. Especially in the older instances, AMD is typically cheaper but not as fast, so deciding comes down to how much compute power you truly need. Because AMD has recently caught up speed-wise, it’s more straightforward to compare newer instances, but still depends on your use case. It’s like comparing a Mustang and a Porsche: which car is “better” depends on the race course. Lots of tight corners, you want the sports car. Big long straightaways, stick with the muscle car. It’s just about the needs of your application.
All that being said, in many cases, switching to AMD will save you money, and often without sacrificing any performance. In one experiment comparing the costs of serving 500 million MySQL queries per hour between AMD, Intel, and Graviton instances, they found that the AMD instance, the c5a.4xlarge, can serve the same load at a 9% cost reduction compared to the Intel-based c5.4xlarge. A 2021 IEEE study found similar results, although in this case, the AMC processor was both faster and cheaper:
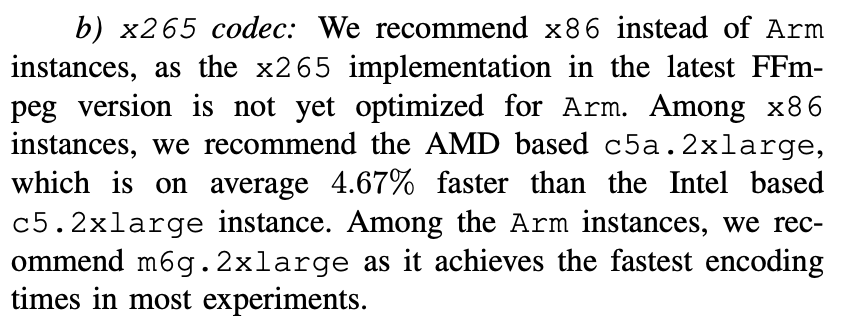
Excerpt from “Where to Encode: A Performance Analysis of x86 and Arm-based Amazon EC2 Instances”
It’s clear that there are savings to be had. And here’s where the beauty of the cloud comes in: to find those savings, we can simply try it. Switch your infrastructure out and see what happens. If it performs just as well at a lower cost, great. If not, switch it back. Just ask this Redditer on the Reddit r/aws thread:

Perfect example. For that particular app, the AMD-powered instance delivered the same performance at lower cost. As for the “tiny bit less money,” that’s where scale comes in. If you optimize every EC2 instance that can achieve equal performance for lower costs, that tiny bit can turn into a whole lot of money.
Interesting aside
It’s interesting to see that AMD, Intel, and the AWS Graviton have converged on using a chiplet-based design. This means that rather than one large die, there are multiple independent components. This allows chips to be custom-designed with features like encoders and encryption units added as needed. AMD was the first to take this approach (to Intel’s disdain), but Intel and AWS recently adopted it as well. Props to AMD for innovating ways to keep its costs down so it can pass those savings on to its customers.

AMD Gen4 Chiplet Design
3. How to find EC2 instances and retype them to AMD
Alright fellow travelers! We’ve shown that AMD CPUs can frequently be a much more cost effective choice than Intel-based CPUs. So how do we go about retyping them to realize those savings?
Like any good road trip, we take it in steps:
- Find Intel-based instances that are eligible for retyping
- Check CPU usage
- Retype EC2 instances from Intel to AMD CPUs
- Monitor the instances’ performance
3.1. Find Intel-based EC2 instances that are eligible for retyping
As always, our priority is reliability. To that end, we have hand-selected a set of Intel-based instances that can be easily and reliably retyped to their AMD counterparts. The specific instance types eligible for AMD-retyping are:
|
Find |
Intel CPU details |
Clock Speed (GHz) |
Replace With |
AMD CPU Details |
Clock Speed (GHz) |
|
Intel Xeon Platinum 8000, Gen 1 or Gen 2 |
Up to 3.1 |
t3a |
EPYC 7000-series Custom |
2.5 |
|
|
Intel Xeon Platinum 8000, Gen 1 or Gen 2 |
Up to 3.1 |
m5a |
EPYC 7000-series Custom |
2.5 |
|
|
Intel Xeon Platinum 8000, Gen 1 or Gen 2 |
Up to 3.1 |
r5a |
EPYC 7000-series Custom |
2.5 |
|
|
Intel Xeon Platinum 8000, Gen 2 |
Up to 3.6 |
c5a |
EPYC 7002 Custom, Gen 2 |
3.3 |
|
|
Intel Xeon Scalable, Gen 3 |
Up to 3.5 |
EPYC Zen3 9000 Gen 3 |
3.6 |
||
|
Intel Xeon Scalable, Gen 3 |
Up to 3.5 |
EPYC Zen3 9000 Gen 3 |
3.6 |
||
|
Intel Xeon Scalable, Gen 3 |
Up to 3.5 |
EPYC Zen3 9000 Gen 3 |
3.6 |
First, use the AWS Cost and Usage Report (CUR) to find all EC2 instances. You could also iterate over every account and region and use the AWS native APIs, but the CUR works at an organizational level and is going to be a lot faster. If you need help setting up your CUR, check out this workshop from AWS Well Architected Labs.
We want the following from our query:
- Find all EC2 instances from the set of types in the above table
- Ignore instances in autoscaling groups
- The instance has been running for more than a month
- The instance is not part of an Auto Scaling Group or an Elastic Map Reduce cluster
Given these constraints, we can use the following query:
SELECT
    line_item_usage_account_id                            AS account_id,
    product_region                                        AS region,
    line_item_resource_id                                 AS resource_id,
    product_instance_type                                 AS instance_type,
    SPLIT_PART(product_instance_type_family, '.', 1)      AS current_type,
    sum(pricing_public_on_demand_cost) / 30 * 365         AS public_cost
FROM <YOUR CUR DB>.<YOUR CUR TABLE>
WHERE line_item_product_code = 'AmazonEC2'
    AND line_item_resource_id <> ''
    AND line_item_usage_type like '%BoxUsage%'
    AND resource_tags_aws_autoscaling_group_name = ''
    AND product_instance_type != ''
    AND resource_tags_aws_elasticmapreduce_job_flow_id = ''
    AND line_item_usage_start_date >= current_date - interval '32' day
    AND line_item_usage_end_date <= current_date - interval '2' day
    AND line_item_line_item_type not in ('Credit', 'Tax','DiscountedUsage')
    AND product_instance_type_family in ('t3', 'c5', 'm5', 'r5', 'c6i', 'm6i', 'r6i')
GROUP BY 1,2,3,4,5;
Looking at the details of the CUR query, notice that we are looking for line_item_usage_type matching BoxUsage. This is looking for the EC2 hourly instance charge. The resource_tags_aws_autoscaling_group_name = '' constraint makes sure that the instance is not part of an Auto Scaling Group. The line_item_usage_start_date constraint makes sure that the instance has been running for at least a month, and the line_item_usage_end_date constraint makes sure that it is still being used.
The details of the CUR query will vary, but this is a good starting point. If you are using reserved instances, a savings plan, or custom discounting, then you will want to take that data into account. The results of the query will look something like the following:
|
account_id |
region |
resource_id |
instance_type |
current_type |
public_ cost |
|
1234567890 |
us-west-2 |
i-0abd1234c56ef78gh |
t3.medium |
t3 |
400.91 |
|
0987654321 |
eu-west-1 |
i-1bcd2345d67fg89ij |
c5.large |
c5 |
525.36 |
|
1122334455 |
ap-southeast-1 |
i-2cde3456e78gh90ij |
m5.xlarge |
m5 |
868.39 |
|
2233445566 |
us-east-1 |
i-8def4567f89gh01ij |
r5.2xlarge |
r5 |
1215.67 |
|
3344556677 |
ap-northeast-2 |
i-4efg5678h90ij12kl |
c6i.8xlarge |
c6i |
1986.71 |
|
4455667788 |
ap-northeast-1 |
i-5fgh6789i01jk23lm |
m6i.12xlarge |
m6i |
2852.24 |
|
5566778899 |
eu-central-1 |
i-06hij789j12kl34mn |
r6i.16xlarge |
r6i |
3965.77 |
There we have it: our list of candidate instances that can be converted to their AMD counterparts to achieve greater AWS savings.
3.2. Check CPU usage
Next up, we need to look into the performance details and requirements of each type. This is how we identify the instances that are underutilizing CPU and are therefore good candidates to retype.
T3/M5/R5 instances: Looking at the Intel and AMD Instance Equivalence table, notice that the clock speeds of these processors are 20% slower than their Intel counterparts. These instances are for general compute (T, M) or for memory optimized (R) applications, and are not expected to have the CPU as the rate-limiting step. In any case, we don’t want the conversion to have an adverse effect on performance. To ensure this, we look at the CloudWatch data for CPU utilization.
The following CloudWatch query, using Python and boto3, queries a given instance for max CPUUtilization in one minute intervals for the past 32 days.
def query_cpu_utilization():
    client = boto3.client('cloudwatch')

    response = client.get_metric_data(
        MetricDataQueries=[
            {
                'Id': 'cpuUtilization',
                'MetricStat': {
                    'Metric': {
                        'Namespace': 'AWS/EC2',
                        'MetricName': 'CPUUtilization',
                        'Dimensions': [
                            {
                                'Name': 'InstanceId',
                                'Value': 'YOUR_INSTANCE_ID' #replace with your instance ID
                            },
                        ]
                    },
                    'Period': 60, # Period in seconds, here 1 minute
                    'Stat': ‘Average’, # retrieve the average CPU utilization
                },
                'ReturnData': True,
            },
        ],
        StartTime=datetime.now() - timedelta(days=32),
        EndTime=datetime.now(),
        ScanBy='TimestampDescending',
    )

    data_points = response['MetricDataResults'][0]['Timestamps']
    values = response['MetricDataResults'][0]['Values']
Using this request, we can make sure that the CPU utilization is less than 80% for the vast majority of the blocks. The logic is that if the CPU utilization is less than 80%, then there will be minimal performance degradation. Note that single-threaded performance will still be affected, but that’s rarely an issue, as single-threaded compute-bound applications would most likely be using a different instance type.
C5 instances: Looking at the C5 instance table, we see that there is a difference in clock speeds between the C5 and the C5a. Although they are closer (3.6 Ghz vs 3.3 Ghz), we still want to err on the side of caution. Follow the above process, but set the threshold to 90%.
C6/M6/R6 instances: For 6th generation AWS instances, AMD actually has slightly faster clock speeds, so we don’t have to check the CPU utilization.
To wrap that up:
- Use the CUR to find running instances of type T3, M5, R5, C5, C6i, M6i, and R6i that have been running for at least 31 days.
- For T3/M5/R5 instances, check CloudWatch and check for less than 80% average CPU utilization.
For C5 instances, check CloudWatch and check for less than 90% average CPU utilization.
For Gen6 and above instances, no CPU utilization check is necessary. - Instances that pass the checks, or don’t need them, can be retyped. Let’s make it happen.
3.3. Retype EC2 instances from Intel to AMD CPUs
Now that we have identified the instances that we want to retype and we know the new instance type from the Instance Equivalence Table, the actual retyping is relatively straightforward. Here’s the process:
- Snapshot candidate instance
- Stop the instance
- Take final snapshot
- Retype the instance, and start it.
- If the instance started correctly, the process is complete.
Otherwise:
1. Stop the instance.
2. Change the instance type to the original type.
3. Start the instance.
We can accomplish this using standard EC2 APIs.
Describe the instance. From this you get the volume-id
aws ec2 describe-instances --instance-ids i-0abcd1234efgh5678 Create a snapshot of the instance
aws ec2 create-snapshot --volume-id 'vol-049df61146f12f357' --description "This is my root volume snapshot, pre-shutdown"Stop the instance
aws ec2 stop-instances --instance-ids i-0abcd1234efgh5678Create final snapshot
aws ec2 create-snapshot --volume-id 'vol-049df61146f12f357' --description "This is my root volume snapshot, final snapshot before retyping."Retype the instance
aws ec2 modify-instance-attribute --instance-id i-0abcd1234efgh5678 --instance-type "{"Value": "m6a.12xlarge"}"Start the instance
aws ec2 start-instances --instance-ids i-0abcd1234efgh5678The last command will return immediately. It’s possible that it may return an InsufficientInstanceCapacity error, which occurs when there is no available hardware in the particular availability zone. This is rare, but if you do get that error, just wait a minute and retry.
In most cases, the command will return an output similar to the following:
{
  "StartingInstances": [
    {
      "CurrentState": {
        "Code": 0,
        "Name": "pending"
      },
      "InstanceId": "i-0abcd1234efgh5678",
      "PreviousState": {
        "Code": 80,
        "Name": "stopped"
      }
    }
  ]
}
Note that the current state of the instance is pending. You want to check on the state of the instance to make sure that the instance has successfully started. To do this, you can use the describe-instance-status command:
aws ec2 describe-instance-status --instance-id i-0abcd1234efgh5678Query this command every 10 seconds or so for up to five minutes. If everything goes successfully, after a few tries you will see output like the following:
{
    "InstanceStatuses": [
        {
            "InstanceId": "i-0abcd1234efgh5678",
            "InstanceState": {
                "Code": 16,
                "Name": "running"
            },
            "AvailabilityZone": "us-west-2a",
            "SystemStatus": {
                "Status": "ok",
                "Details": [
                    {
                        "Name": "reachability",
                        "Status": "passed"
                    }
                ]
            },
            "InstanceStatus": {
                "Status": "ok",
                "Details": [
                    {
                        "Name": "reachability",
                        "Status": "passed"
                    }
                ]
            },
            "Events": []
        }
    ]
}
If this worked, great, keep going. If you hit 5 minutes and the InstanceState is still “pending”, then stop your instance, change the type back to what it was before, and start it again.
3.4. Monitor the instances’ performance
You know us: we always want to err on the side of caution (we’ve said it before, we’ll say it again). That’s why we recommend monitoring the EBS throughput and IOPS as well as network bandwidth to make sure that the newly retyped instances are delivering equivalent performance. We can do this through CloudWatch alarms that can trigger a Lambda function to initiate a rollback.
The metrics that we’ve found to be the most useful in monitoring performance are:
- Sum of EBSWriteBytes and EBSReadBytes – monitors throughput.
- Sum of EBSReadOps and EBSWriteOps – monitors IOPS.
- Sum of NetworkIn and NetworkOut – monitors network.
We can use a feature called metric math to add these six metrics together. (The full list of metrics is available here.)
We want to monitor each of these metrics for their maximum value at one minute periods, with two minutes until an alarm is raised. We expect resources to hit their maximums instantaneously, but not stay there for extended periods of time. If this happens after we have retyped the instance (and presuming that the instance was right-sized before retyping), then we want to initiate a rollback.
The first alarm can be setup with the AWS CLI like this:
aws cloudwatch put-metric-alarm
--alarm-name "HighEBSIOPS"
--alarm-description "Alarm when total EBS IOPS exceeds the instance max"
--actions-enabled
--alarm-actions 'YOUR-SNS-TOPIC'
--metric-name "HighEBSIOPS"
--namespace "AWS/EBS"
--statistic "Sum"
--period 60
--evaluation-periods 2
--threshold 30000
--comparison-operator GreaterThanThreshold
--metrics Id=m1,Expression="m2 + m3",Label=TotalIOPS
    Id=m2,MetricStat={Metric={Namespace=AWS/EBS,MetricName=EBSReadBytes,Dimensions=[{Name=InstanceId,Value='i-InstanceID'}]},Period=60,Stat=Sum},ReturnData=false
    Id=m3,MetricStat={Metric={Namespace=AWS/EBS,MetricName=EBSWriteBytes,Dimensions=[{Name=InstanceId,Value='i-InstanceID'}]},Period=60,Stat=Sum},ReturnData=false
You will need to substitute in your own SNS topic, and then of course have an action associated with that SNS topic. This is most likely going to be a Lambda function that retypes the instance.
4. Optimize EC2 instances for price and performance automatically with CloudFix
As with many of our fixers, the process above isn’t necessarily hard. The effort comes less from running the retyping operation and more from the logic, understanding which instances can be safely retyped and ensuring the process runs safely and smoothly… and then continuing to do so for every EC2 instance as your infrastructure evolves.
That’s where CloudFix comes in. We worked directly with AMD to develop our Intel→AMD fixer to make sure that the performance of your application remains competitive and less expensive.
This fixer automates the process above, using CloudWatch historical data to correctly identify instances that can be retyped. Once we have identified a candidate for retyping, we make sure that the instance comes up successfully. If there’s is a hiccup in the process, CloudFix reverts the changes and notifies you. After the retyping, we monitor the instances for the next 31 days to guarantee that the new instance continues to perform under a variety of circumstances. Once the instance proves that it’s functioning well, we stop monitoring, so you have no additional costs.
Another reason to trust CloudFix: our continuous innovation. The new M7a instance type powered by the AMD EPYC Bergamo (4th generation), was just launched last month (June 2023). When a comparable Intel-based instance is launched (presumably to be called the M7i), we will update our fixer to take it and all other new instances into account. With CloudFix, you’re always covered, no matter how fast the industry moves.
Let’s wrap up this road trip with a quote from Channy Yun, principal developer advocate at AWS, who tweeted at the launch of the C6a in 2022:
With the launch of #C6a instances there are now officially more than 500 #AmazonEC2 instances for customers to choose from! https://t.co/54537rGa8B https://t.co/296kmZHGm1
— Channy Yun(윤석찬) (@channyun) February 15, 2022
Today, that number is 586. It’s incredible to have so many options for balancing cost and performance, and pretty darn great to have a tool like CloudFix to do so automatically. So go forth, retype and optimize, and achieve more AWS savings than ever… maybe even enough for that trip to Italy.
Ready to start saving on AWS? See how much you could cut from your cloud bill with a free cost optimization assessment, or explore CloudFix automated Finder/Fixers that eliminate waste across 30+ AWS services.
Related Articles
-
<
- AWS Cost Optimization: The Complete Guide to Lowering Your Cloud Bill (2026)
- AWS Cost Optimization Tools: The Complete Comparison Guide (2026)
- Find Idle AWS Transfer Family Endpoints
- CloudFix Finder: SageMaker Rightsize Instances (Manual Fix)
li>RightSpend vs ProsperOps (Flexera): The Independent EC2 Discount Alternative