CloudFront compression can cut your data transfer costs by 65-80%. Here's how it works, when to enable it, and how to configure it correctly.
CloudFront Cost Optimization: Save 65-80% on CDN Costs (2026 Guide)

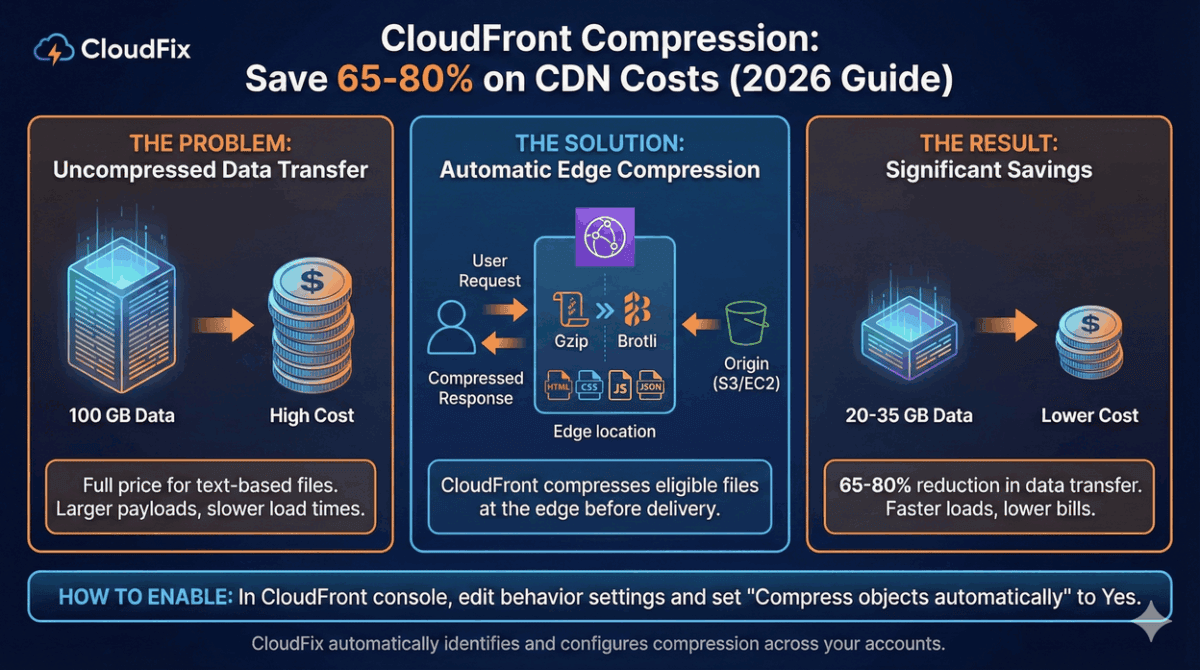
CloudFront compression reduces data transfer costs by 65-80% for text-based content. If you’re not using it, you’re paying full price for files that could be a fraction of the size.
Since 2015, CloudFront has supported automatic compression using gzip and Brotli. These algorithms compress HTML, CSS, JavaScript, JSON, and other text files before delivering them to users. The result: smaller payloads, faster load times, and significantly lower CloudFront bills.
This guide covers how compression works, which files benefit most, and how to enable it without breaking anything.
How Much Can You Save?
CloudFront charges based on data egress, ie the amount of data transferred from edge locations to users. Compression reduces the size of that data.
Typical compression ratios by file type:
| File Type | Compression Ratio | Cost Reduction |
|---|---|---|
| JavaScript | 77% | Pay for 23% of original |
| HTML | 70-80% | Pay for 20-30% of original |
| CSS | 70-80% | Pay for 20-30% of original |
| JSON | 70-85% | Pay for 15-30% of original |
| SVG | 50-70% | Pay for 30-50% of original |
| XML | 60-80% | Pay for 20-40% of original |
According to AWS, a typical web page with mixed text, scripts, and images sees overall payload reduction approaching 80%.
Example calculation:
Without compression: 100 GB data transfer × $0.085/GB = $8.50/month
With 70% compression on text files (assuming 60% of content is compressible):
- Compressible: 60 GB → 18 GB after compression
- Non-compressible: 40 GB
- Total: 58 GB × $0.085/GB = $4.93/month
Savings: 42% on CloudFront data transfer
For high-traffic sites, these savings compound quickly. A site transferring 10 TB/month could save $3,000-4,000 annually just by enabling compression.
How CloudFront Compression Works
When compression is enabled, CloudFront automatically compresses eligible files at the edge:
- User requests content: Browser sends
Accept-Encoding: gzip, brheader indicating it supports compression - CloudFront checks cache: If compressed version exists in cache, serve it immediately
- Cache miss: fetch from origin: CloudFront retrieves file from your origin (S3, EC2, etc.)
- Compress and cache: CloudFront compresses the file, caches both versions, and returns the compressed version
- Subsequent requests: Compressed version served directly from cache
CloudFront stores both compressed and uncompressed versions. Users whose browsers don’t support compression (extremely rare in 2026) get the uncompressed version.
Compression Algorithms
CloudFront supports two compression algorithms:
Gzip
- Universal browser support
- Good compression ratios (60-80%)
- Fast compression/decompression
Brotli
- Better compression (15-25% smaller than gzip)
- Supported by all modern browsers
- Requires HTTPS
Enable both. CloudFront automatically serves Brotli when supported, falling back to gzip for older clients.
What Gets Compressed (and What Doesn’t)
CloudFront only compresses files with specific Content-Type headers. This prevents attempting to compress already-compressed binary files.
Compressed file types include:
text/htmltext/csstext/javascript/application/javascriptapplication/jsontext/xml/application/xmlimage/svg+xmltext/plainapplication/x-font-ttffont/opentype
NOT compressed (already compressed or binary):
image/jpeg,image/png,image/gif,image/webpvideo/*(all video formats)audio/*(all audio formats)application/zip,application/gzipapplication/pdf
File size requirements:
- Minimum: 1 KB (files smaller than 1 KB aren’t worth compressing)
- Maximum: 10 MB
How to Enable CloudFront Compression
Prerequisites
Compression requires:
- Cache policy with compression enabled: Both
EnableAcceptEncodingGzipandEnableAcceptEncodingBrotliset to true - TTL greater than zero: Files must be cacheable (if TTL = 0, CloudFront won’t compress)
- Compress Objects Automatically enabled: In the cache behavior settings
Using AWS Console
- Open the CloudFront console
- Select your distribution
- Go to Behaviors tab
- Edit the default behavior (or relevant cache behavior)
- Under Cache key and origin requests:
- Select or create a cache policy with compression enabled
- Set Compress objects automatically to Yes
- Save changes
Using AWS CLI
Create a cache policy that enables compression:
{
  "CachePolicyConfig": {
    "Name": "Compression-Enabled-Policy",
    "MinTTL": 86400,
    "MaxTTL": 31536000,
    "DefaultTTL": 86400,
    "ParametersInCacheKeyAndForwardedToOrigin": {
      "EnableAcceptEncodingGzip": true,
      "EnableAcceptEncodingBrotli": true,
      "HeadersConfig": {
        "HeaderBehavior": "none"
      },
      "CookiesConfig": {
        "CookieBehavior": "none"
      },
      "QueryStringsConfig": {
        "QueryStringBehavior": "none"
      }
    }
  }
}
# Create the cache policy
aws cloudfront create-cache-policy \
--cache-policy-config file://cache-policy.json
# Update distribution to use the policy
aws cloudfront update-distribution \
--id E1A2B3C4D5E6F7 \
--distribution-config file://distribution-config.json \
--if-match ETAG_VALUEVerify Compression is Working
Test with curl:
curl -I -H "Accept-Encoding: gzip, br" https://your-domain.com/script.jsLook for
Content-Encoding: brContent-Encoding: gzipIf you see neither, compression isn’t working. Check your cache policy and TTL settings.
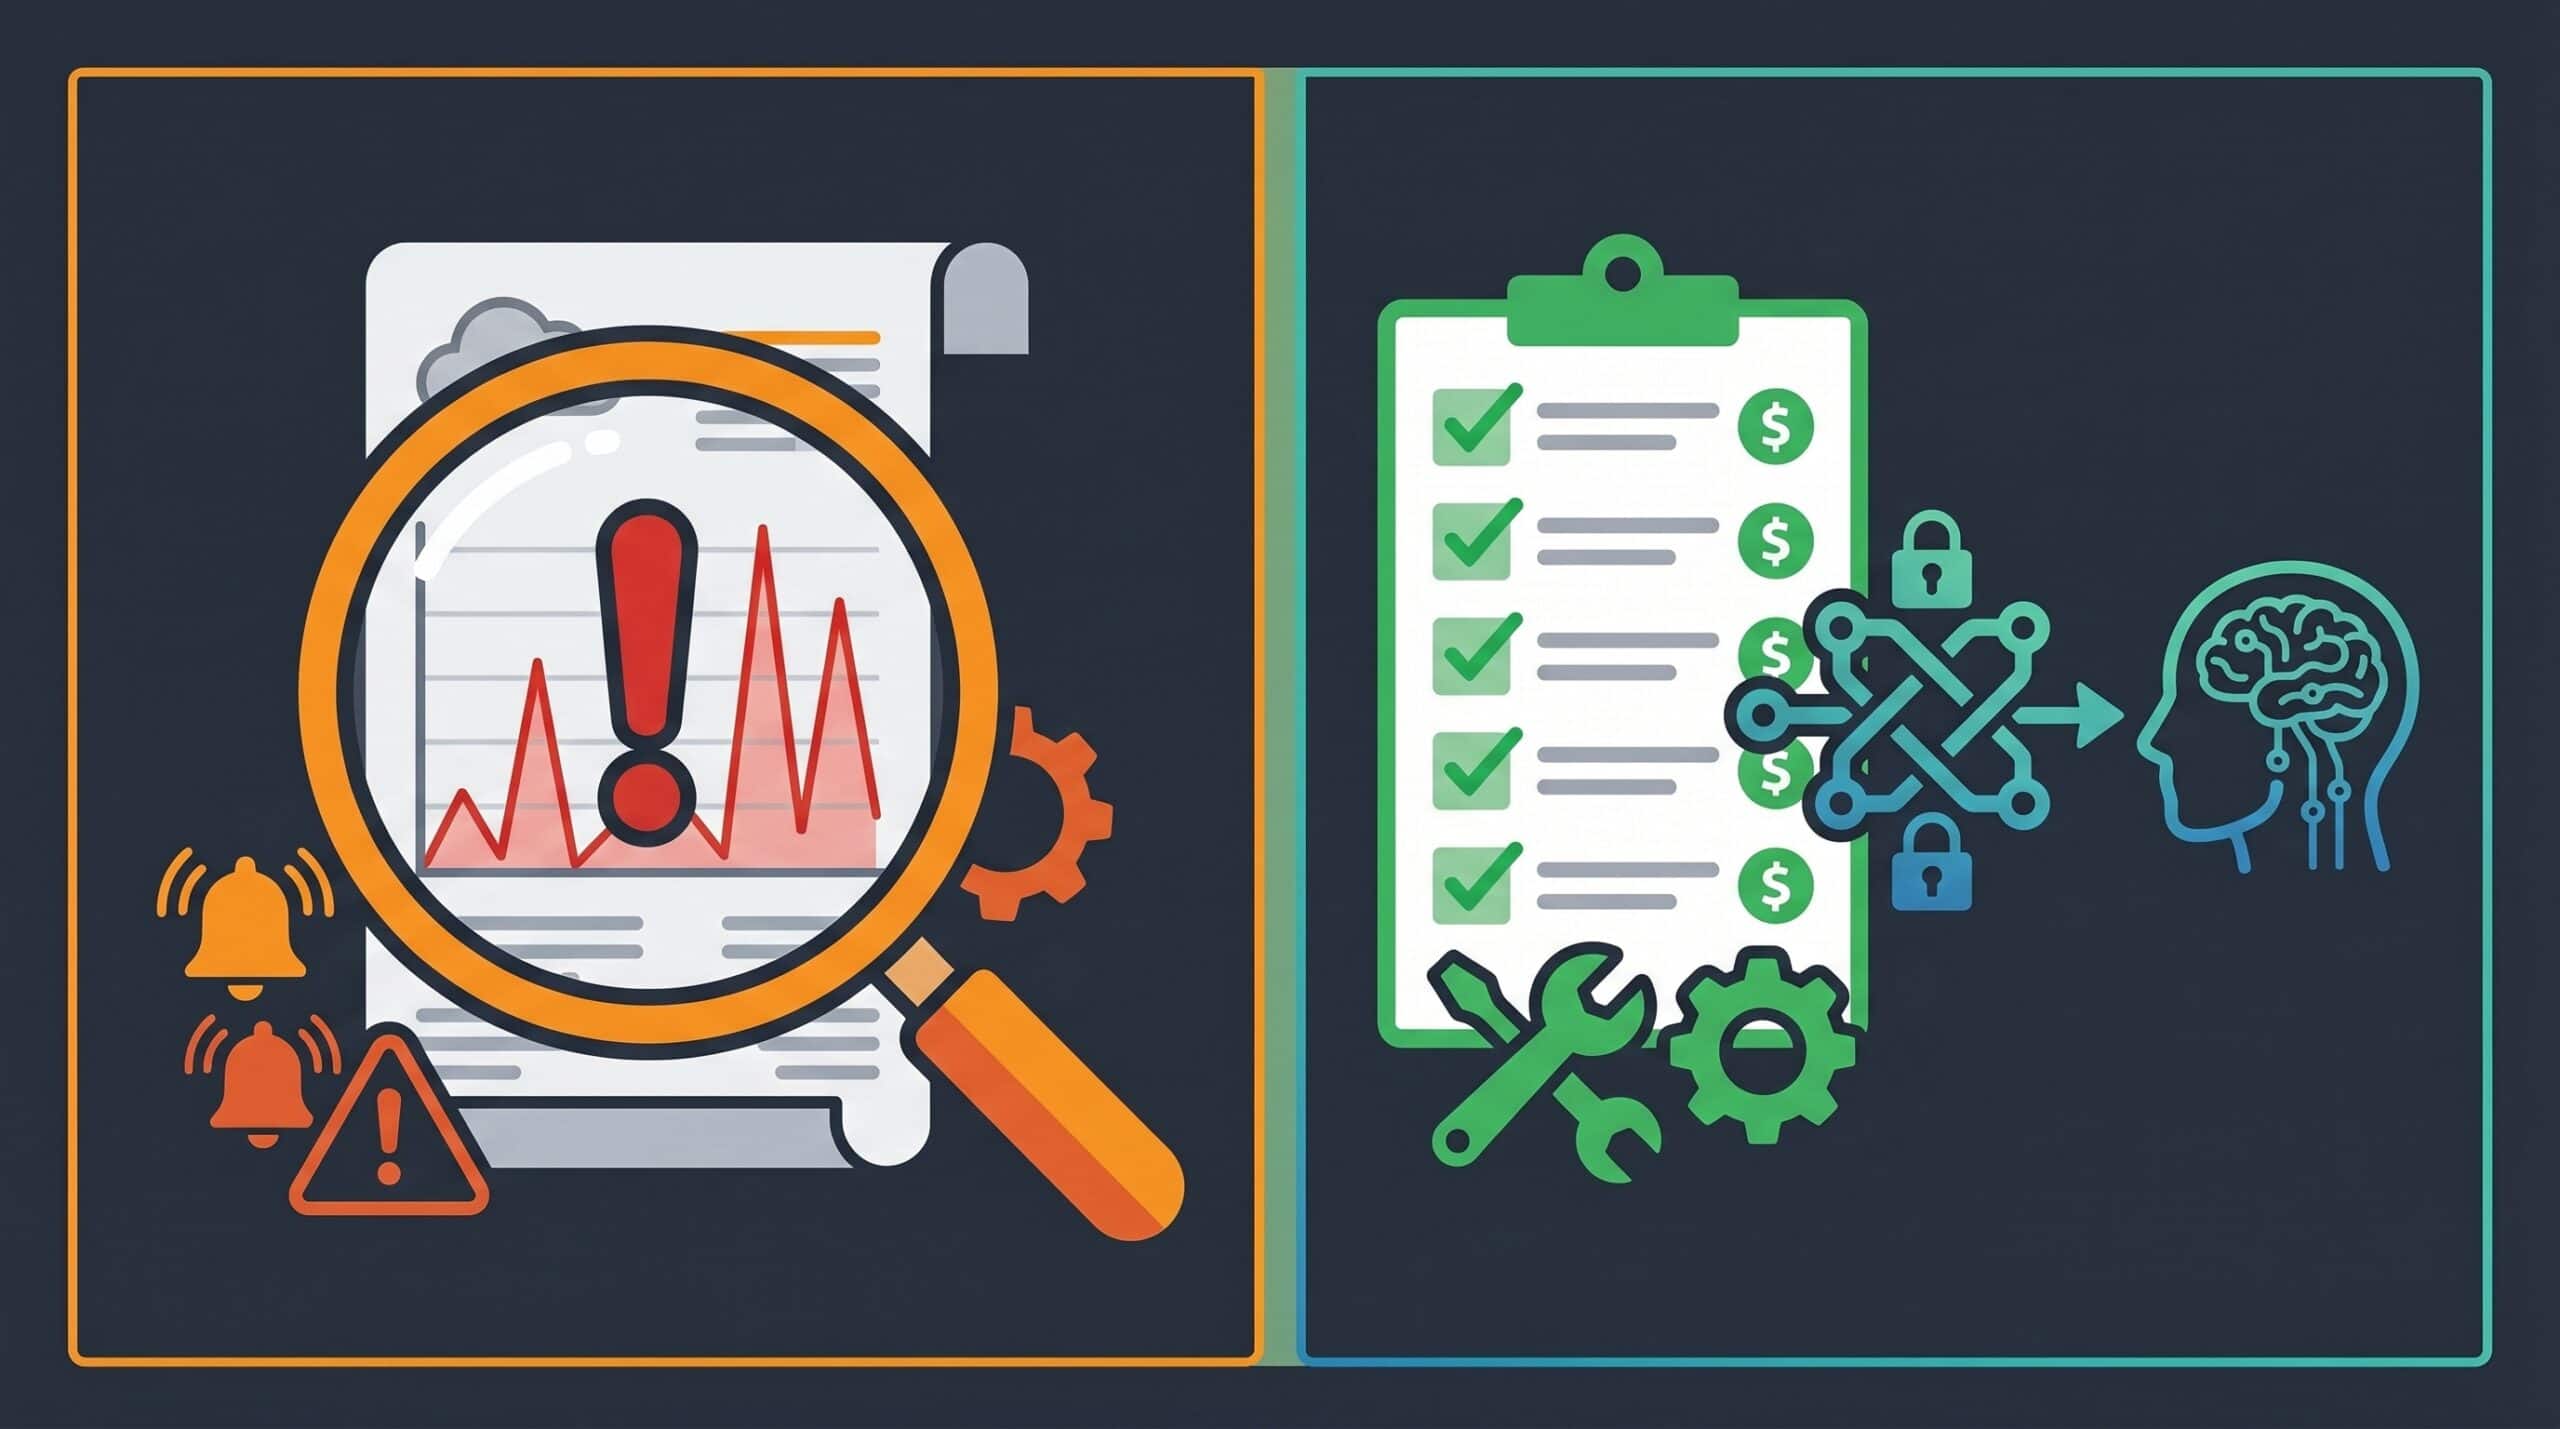
CloudFront compression takes 5 minutes. What else are you missing?
Our 30-plus checklist covers the highest-impact AWS optimizations — ranked by savings and effort. CloudFront compression is just one of the quick wins.
Common Problems and Fixes
Compression not applying
Problem: Files are served uncompressed despite enabling compression.
Causes and fixes:
- TTL is zero: Set MinTTL > 0 in your cache policy
- Wrong Content-Type: Ensure your origin sends correct Content-Type headers
- File too small: Files under 1 KB won’t be compressed
- Origin already compresses: If your origin sends
Content-Encoding: gzip, CloudFront won’t double-compress. Either let CloudFront handle compression or let the origin do it, not both.
Mixed results across files
Problem: Some files compress, others don’t.
Cause: Different cache behaviors may have different settings.
Fix: Review all cache behaviors in your distribution. Each path pattern (e.g., /api/*, /static/*) has its own compression settings.
Origin compatibility issues
Problem: Origin returns already-compressed content inconsistently.
Best practice: Configure your origin to serve uncompressed content and let CloudFront handle compression. This ensures consistent behavior and optimal caching.
For S3 origins: Upload files uncompressed. For EC2/ALB origins: Disable origin compression.
Performance Impact
Some teams worry about compression overhead. Don’t.
Decompression is nearly instant: Studies show gzip decompression is orders of magnitude faster than network transfer time. Users benefit from faster page loads even accounting for decompression.
No server-side overhead: CloudFront compresses at the edge, not at your origin. Your EC2 instances or Lambda functions aren’t doing extra work.
Cache hit ratio remains high: Compressed and uncompressed versions are cached separately. The vast majority of requests hit cache regardless.
CloudFront Security Savings Bundle
If you’re spending significantly on CloudFront, consider the CloudFront Security Savings Bundle:
- Commit to a monthly CloudFront spend for one year
- Get up to 30% discount on CloudFront charges
- Receive 10% of your commitment as AWS WAF credits
Example: $70/month commitment = $100 worth of CloudFront + $7/month WAF credits
This stacks with compression savings. Enable compression first to reduce your baseline, then commit to the reduced spend level.
Flat-Rate Pricing Plans (New in 2025)
AWS now offers flat-rate CloudFront plans with no overage charges:
| Plan | Monthly Cost | Data Transfer | Requests |
|---|---|---|---|
| Free | $0 | 100 GB | 1M |
| Pro | $15 | 50 TB | 10M |
| Business | $200 | 50 TB | 125M |
| Premium | $1,000 | 50 TB | 500M |
These plans include WAF, DDoS protection, and Route 53 DNS. If your usage is predictable and you want cost certainty, flat-rate may be worth evaluating.
However, for most customers, pay-as-you-go with compression enabled remains the best value.
Enable Compression at Scale with CloudFix
Finding all CloudFront distributions without compression and configuring them correctly takes time, especially across multiple AWS accounts.
CloudFix automatically:
- Scans all accounts for CloudFront distributions
- Identifies distributions where compression can be safely enabled
- Excludes distributions with explicit no-compression policies
- Configures compression with compatible cache policies
- Tracks savings across your organization
The CloudFix “CloudFront Turn On Compression” fixer handles the complexity so you don’t have to audit each distribution manually.
Get a free savings assessment to see how much you’re overspending on CloudFront data transfer.
How much are you overspending on AWS?
CloudFront compression is one of dozens of one-click fixes CloudFix implements automatically. See your total savings across all services — free assessment, no commitment.
CloudFront Pricing Tiers: Understanding the Full Cost Picture
Many organizations treat CloudFront as a simple “bandwidth costs” service, but the pricing structure is far more nuanced. Understanding CloudFront’s complete pricing model is the first step toward significant cost optimization.
Data Transfer Pricing Breakdown
CloudFront uses a tiered pricing model for data transfer out to the internet, with costs varying by region:
| Data Transfer Tier | Cost per GB | Monthly Volume | Cumulative Cost |
|---|---|---|---|
| Free Tier | $0.000 | 1 TB (1,024 GB) | $0 |
| Tier 1 | $0.085 | 0-10 TB | $0 – $87,040 |
| Tier 2 | $0.080 | 10-50 TB | $87,040 – $373,760 |
| Tier 3 | $0.060 | 50-100 TB | $373,760 – $886,080 |
| Tier 4 | $0.050 | 100-500 TB | $886,080 – $3,226,080 |
Key Insight: The savings from optimization increase dramatically at higher tiers. A 10% reduction in data transfer saves $8,704 per month at the 10 TB mark, but $32,260 per month at 500 TB.
Request Pricing
Beyond data transfer, CloudFront charges for requests:
| Request Type | Free Tier | Cost per 1M Requests |
|---|---|---|
| GET/HEAD Requests | 10 million | $0.75 – $1.16 |
| PUT/POST/DELETE Requests | 10 million | $0.75 – $1.16 |
| Custom Origin Requests | 10 million | $0.75 – $1.16 |
Hidden Cost: Many organizations overlook that cache MISS requests count as requests, potentially doubling your request costs if your cache hit ratio is low.
Origin Pricing Strategies
This is where CloudFront pricing gets interesting: data transfer between CloudFront and AWS origins is completely FREE. This single fact changes the entire optimization equation.
| Origin Type | Origin Data Transfer | CloudFront Data Out | Total Cost Impact |
|---|---|---|---|
| S3 Origin | FREE | Charged | Lowest |
| ALB Origin | FREE | Charged | Lowest |
| Custom Origin (Non-AWS) | Charged | Charged | Highest |
Critical Finding: Using a custom origin (like on-premises servers) adds significant costs because you pay for data transfer TO the origin in addition FROM the CloudFront edge locations to users.
Flat-Rate Plans vs. Pay-As-You-Go
CloudFront offers flat-rate plans that can significantly reduce costs for predictable traffic:
| Plan | Monthly Cost | Data Transfer Included | Benefits |
|---|---|---|---|
| Starter | $0 | None (Pay-as-you-go) | Best for variable traffic |
| Business | ~$15 | 50 TB with zero overages | Predictable pricing |
| Premium | ~$200 | 500 TB with zero overages | For high-traffic sites |
| Enterprise | ~$1,000+ | Custom volume | Large scale deployments |
ROI Example: If your average monthly CloudFront bill is $1,500, upgrading to the Premium plan at $200/month saves you $1,300 monthly if you consistently use around 500 TB of data transfer.
Cache Policy Optimization: Maximizing Your Hit Ratio
Cache policies are the single most important factor in CloudFront cost optimization. A higher cache hit ratio means fewer requests to your origin, reduced data transfer costs, and faster response times for users.
Understanding Cache Keys
Every CloudFront cache behavior includes a cache key – the combination of request parameters that determines whether two requests should receive the same cached response. The key insight: smaller cache keys = higher hit ratios.
What to Include in Cache Keys:
– Path (required) – URL path like /images/logo.png
– Headers – Only headers that affect content
– Cookies – Only for personalized content
What to Exclude from Cache Keys:
– User-Agent header (rarely affects content)
– Host header (should be stable for given distribution)
– Non-unique headers like Accept-Encoding if you handle gzip at origin
Managed Cache Policies vs. Custom
AWS provides pre-configured managed cache policies that are optimized for common use cases:
Managed Policy Benefits:
– Optimized to minimize cache key size
– Regularly updated by AWS based on best practices
– Require less maintenance
– Start with the best configuration out of the box
Popular Managed Policies:
– CachingOptimized – Minimal cache key, optimized for static content
– CachingDisabled – No caching (use only for highly dynamic content)
– Managed-AllViewer – Includes more headers for complex scenarios
Content-Type Based Caching Strategy
Different content types require different caching approaches:
| Content Type | Recommended TTL | Cache Behavior | Why |
|---|---|---|---|
| Static Assets (JS/CSS/Images) | 1-7 days | Aggressive caching | Seldom changes, huge performance impact |
| API Responses (JSON/XML) | 5-15 minutes | Selective caching | Some cacheable, some not |
| HTML Pages | 0-1 hours | Cache with validation | Frequently updated but often identical |
| Dynamic Content (News/Stock) | 0-30 seconds | Cache-Control headers | Must be very fresh |
Implementation Strategy:
# Example CloudFront distribution configuration
# Static content - aggressive caching
/cache-behavior-static
  path-pattern: /assets/*
  allowed-methods: GET HEAD
  cached-methods: GET HEAD
  compress: true
  forwarded-values:
    query-string: false
    headers: '*'
    cookies: 'none'
  default-ttl: 86400  # 24 hours
  max-ttl: 604800    # 7 days
  viewer-protocol-policy: redirect-to-https

# API responses - selective caching
/cache-behavior-api
  path-pattern: /api/*
  allowed-methods: GET HEAD
  cached-methods: GET HEAD
  compress: true
  forwarded-values:
    query-string: true
    headers: 'Authorization,X-Request-ID'
    cookies: 'none'
  default-ttl: 300    # 5 minutes
  max-ttl: 900       # 15 minutes
Cache Invalidation Strategy
Cache invalidation is a double-edged sword:
– Pro: Ensures users get updated content
– Con: Incurs costs and reduces cache hit ratio
Best Practices:
1. Use short TTLs instead of invalidation for frequently updated content
2. Version your URLs (e.g., /app.js?v=2.3.1) instead of invalidating
3. Cache with validation headers (ETag, Last-Modified) for conditional requests
4. Limit invalidation to critical updates only
Invalidation Cost: CloudFront charges $0.005 per 1,000 invalidated paths. Invalidating 10,000 paths costs $50.
Monitoring and Optimization
Track these key metrics weekly:
– Cache Hit Ratio: Aim for >80% for static content
– Cache Miss Ratio: Should be <20%
– Origin Request Count: Fewer = better
– Data Transfer Savings: Compare with and without caching
CloudWatch Alarms to set:
– Cache hit ratio < 70% for 1 hour
– Cache miss count > 10,000 in 1 hour
– Origin response time > 100ms
Origin Pricing Strategies: S3 vs ALB vs Custom Origins
The choice of origin has profound implications for CloudFront costs, performance, and operational complexity. Let’s break down the strategic considerations for each origin type.
S3 Origins: The Cost-Effective Choice for Static Content
When to Use S3:
– Static websites (HTML/CSS/JS)
– Media files (images, videos, audio)
– Document downloads (PDFs, zip files)
– Versioned assets with immutable content
S3 Origin Benefits:
– Zero cost for data transfer between CloudFront and S3
– Built-in versioning for asset history
– Lifecycle policies for automatic tiering
– HTTPS endpoint included
– No infrastructure to manage
S3 Origin Limitations:
– Not suitable for dynamic content
– Limited request rate (3,500 PUT/COPY/POST/DELETE per second)
– Cannot run application logic
– Upload latency for large files
Performance Optimization:
# Enable S3 Transfer Acceleration for faster uploads
aws s3api put-bucket-accelerate-configuration \
    --bucket your-bucket \
    --accelerate-configuration Status=Enabled
Cost Comparison:
– S3 Standard: $0.023 per GB/month storage + $0.0004 per GET request
– S3 Intelligent Tiering: Automatic cost optimization based on access patterns
– S3 Glacier Deep Archive: $0.00099 per GB/month for infrequently accessed content
ALB Origins: Dynamic Content Perfected
When to Use ALB:
– Dynamic web applications
– API-based services
– E-commerce platforms
– Applications requiring user authentication
ALB Origin Benefits:
– Zero data transfer cost to CloudFront (same as S3)
– Load balancing across multiple instances
– SSL termination at the edge
– Health checks and automatic failover
– Integration with ECS, EKS, and EC2
ALB Origin Limitations:
– Hourly charges for ALB itself (~$0.025-$0.030 per hour)
– Limited by the backend service capacity
– Requires proper security group configuration
– More complex setup than S3
Performance Optimization:
# CloudFront origin configuration for ALB
Origin:
  DomainName: your-alb-1234567890.us-east-1.elb.amazonaws.com
  OriginPath: /production
  CustomHeaders:
    - HeaderName: X-Forwarded-Proto
      HeaderValue: https
  ConnectionTimeout: 10
  OriginShield: Enabled
Cost Comparison:
– ALB hourly: ~$0.025-$0.030
– ALB data processing: $0.008 per GB
– ALB capacity unit: $0.015-0.025 per hour (depending on LCUs)
– Total: Significantly cheaper than custom origins when combined with CloudFront
Custom Origins: The Last Resort
When to Use Custom Origins:
– On-premises servers
– Third-party APIs
– Non-AWS cloud providers
– Applications requiring custom routing
Custom Origin Costs:
– Data transfer TO origin: $0.01-$0.02 per GB
– Data transfer FROM origin: Plus standard CloudFront egress costs
– Additional latency: Network hops between edge and origin
Cost Impact Example:
For 100 TB monthly data transfer:
– AWS Origin (S3/ALB): $0 (transfer to origin) + $6,144 (CloudFront egress at $0.06/GB) = $6,144
– Custom Origin: $2,000 (transfer to origin) + $6,144 (CloudFront egress) = $8,144
– Additional Cost: $2,000/month (33% more expensive)
Strategic Origin Selection Matrix
| Factor | S3 Origin | ALB Origin | Custom Origin |
|---|---|---|---|
| Cost | Lowest | Low | Highest |
| Setup Complexity | Very Low | Medium | High |
| Performance | Excellent | Good | Variable |
| Static Content | Perfect | Good | Overkill |
| Dynamic Content | Not Suitable | Perfect | Good |
| Scalability | Excellent | Excellent | Manual |
| Maintenance | None | Low | High |
Hybrid Approach: Many organizations use multiple origins – S3 for static assets, ALB for dynamic content, and minimize custom origins.
Migration Strategy to Reduce Costs
Phase 1: Audit Current Origins
# List all CloudFront distributions and their origins
aws cloudfront list-distributions --query 'DistributionList.Items[*].{Origins:Origins, DomainName:DomainName}'
Phase 2: Identify Cost-Saving Opportunities
– Move static assets from custom origin to S3
– Move dynamic content from custom origin to ALB
– Implement proper caching to reduce origin requests
Phase 3: Implement Changes
1. Create S3 buckets for static content
2. Upload current assets to S3
3. Update CloudFront distribution configuration
4. Test thoroughly before cutover
5. Monitor performance and costs
Expected Savings: 20-40% reduction in CloudFront costs when moving from custom origins to AWS origins.
Data Transfer Cost Reduction: Taming the Inter-Region Beast
Inter-region data transfer costs can silently drain your AWS budget. CloudFront plays a crucial role in reducing these costs by serving content from edge locations closest to your users.
Understanding Cross-Region Data Transfer Costs
When your resources span multiple AWS regions, you incur data transfer costs:
| Transfer Type | Cost per GB | Notes |
|---|---|---|
| Same region | $0.00 | No cost |
| Cross-region | $0.01-$0.02 | Varies by regions |
| Internet egress | $0.08-$0.11 | CloudFront costs |
Hidden Cost: If you serve content from us-east-1 to users in eu-west-1, you pay:
1. EC2 to CloudFront: $0 (free within CloudFront)
2. CloudFront to user: $0.08-$0.11 per GB
3. But if using EC2 directly: EC2 to user: $0.08-$0.11 per GB
Plus potential cross-region costs if your backend is in a different region.
CloudFront’s Advantage for Multi-Region Deployments
CloudFront automatically routes users to the closest edge location, eliminating cross-region data transfer costs for user traffic.
Scenario Comparison:
Without CloudFront:
– User in Tokyo requests content from us-east-1
– Data transfer: us-east-1 → Tokyo = $0.12 per GB
– Plus potential cross-region costs if backend is elsewhere
With CloudFront:
– User in Tokyo requests content
– CloudFront routes to Tokyo edge = $0.04 per GB
– CloudFront fetches from origin once = $0 (free to AWS origin)
– Savings: 66%+ reduction
Strategic Edge Location Deployment
Edge Location Strategy:
1. Global Coverage: 600+ edge locations worldwide
2. Regional Optimization: Content cached in optimal edge locations
3. Automatic Routing: Users always get the closest edge
High-Traffic Regions Focus:
– North America: 40% of internet users
– Europe: 15% of internet users
– Asia-Pacific: 35% of internet users
– Other regions: 10% of internet users
Placement Strategy: Focus your caching strategy on these high-traffic regions for maximum impact.
Reducing Backend Data Transfer
Backend Optimization:
1. Minimize API calls between services in different regions
2. Use CloudFront Functions for lightweight transformations at the edge
3. Implement caching for backend responses
4. Batch operations to reduce request frequency
Lambda@Edge Benefits:
– Execute code at CloudFront edge locations
– Reduce load on backend services
– Transform responses at the edge
– No additional data transfer costs
// Lambda@Edge example to reduce backend requests
exports.handler = async (event) => {
  const request = event.Records[0].cf.request;

  // Check cache for existing response
  const cacheKey = request.uri;
  const cachedResponse = await cloudfront.getCacheItem(cacheKey);

  if (cachedResponse) {
    return cachedResponse;
  }

  // Cache the response for 5 minutes
  const response = {
    status: '200',
    headers: {
      'content-type': [{ value: 'application/json' }],
      'cache-control': [{ value: 'max-age=300' }]
    },
    body: JSON.stringify({ message: 'processed' })
  };

  await cloudfront.putCacheItem(cacheKey, response);
  return response;
};
Cost Reduction Strategies
1. Origin Shield
– Reduces the number of requests to your origin
– Consolidates requests from edge locations
– Can reduce origin data transfer by 70%+
2. Compression at the Edge
– Enable Brotli and Gzip compression
– Reduces data transfer by 60-90%
– No additional costs
3. Optimized Caching
– Cache static assets aggressively
– Use cache control headers effectively
– Reduce origin requests by 80%+
4. Regional Distribution
– Deploy multiple origin servers in different regions
– Use CloudFront to route to the closest origin
– Eliminate cross-region costs for backend traffic
Monitoring and Alerting
Key Metrics to Track:
– Cross-region data transfer volume
– CloudFront hit ratio by region
– Origin request volume
– Data transfer costs per region
CloudWatch Metrics:
– BytesDownloaded from CloudFront
– OriginBytes to track origin data transfer
– Requests to monitor request volume
Cost Anomaly Detection:
# Monitor for unusual spikes in cross-region data transfer
aws cloudwatch get-metric-statistics \
    --namespace AWS/CloudFront \
    --metric-name BytesDownloaded \
    --dimensions Name=DistributionId,Value=E1A2B3C4D5E6F7 \
    --start-time 2024-01-01T00:00:00Z \
    --end-time 2024-01-02T00:00:00Z \
    --period 3600 \
    --statistics Sum
Proactive Optimization:
– Set alarms for unusual data transfer spikes
– Monitor cache hit ratios by region
– Regularly review cost reports
– Optimize for high-cost regions first
CloudFix Automated CloudFront Optimization
Manual CloudFront optimization is time-consuming and error-prone. CloudFix’s automated CloudFront optimization engine continuously monitors, analyzes, and optimizes your CloudFront configuration to deliver guaranteed savings.
How CloudFix Automates CloudFront Optimization
CloudFix’s CloudFront optimization engine uses advanced AI algorithms to analyze your traffic patterns and implement targeted optimizations.
The Three-Step Process:
- Continuous Monitoring: CloudFix analyzes 50+ CloudFront metrics including:
- Cache hit/miss ratios by behavior
- Data transfer patterns
- Origin response times
- Error rates
-
Traffic volume by region
-
AI-Powered Analysis: Our proprietary algorithm identifies optimization opportunities by:
- Comparing your performance against industry benchmarks
- Identifying anomalies in traffic patterns
- Predicting future cost trends
-
Recommending optimal settings
-
Automated Implementation: CloudFix automatically applies optimizations including:
- Cache policy refinements
- TTL adjustments
- Compression settings
- Origin configuration updates
- Behavior modifications
Key Optimization Features
1. Smart Cache Policy Optimization
– Analyzes which headers actually affect content
– Removes unnecessary headers from cache keys
– Optimizes TTL values based on content type
– Implements cache versioning to avoid invalidation
2. Dynamic Origin Selection
– Monitors origin performance in real-time
– Automatically routes traffic to optimal origins
– Implements failover mechanisms
– Balances load across multiple origins
3. Traffic Pattern Analysis
– Identifies peak and off-peak hours
– Implements adaptive caching strategies
– Optimizes for regional traffic patterns
– Predicts traffic spikes and prepares accordingly
4. Cost Optimization Engine
– Tracks cost savings in real-time
– Recommends flat-rate plans when beneficial
– Optimizes for data transfer tiers
– Eliminates unnecessary features and services
Real-World Optimization Examples
Case Study 1: E-commerce Platform
Before Optimization:
– 65% cache hit ratio
– Monthly CloudFront costs: $45,000
– 90% of content from custom origin
– No compression enabled
– Manual cache invalidation weekly
After CloudFix Optimization:
– 92% cache hit ratio
– Monthly CloudFront costs: $18,000
– 100% of content from AWS origins (S3 + ALB)
– Brotli compression enabled
– Zero manual cache invalidation
Savings: $27,000/month (60% reduction)
Optimizations Applied:
– Moved static assets to S3 origin
– Implemented aggressive caching for static content
– Added intelligent TTL management
– Enabled Brotli compression
– Implemented cache versioning instead of invalidation
Case Study 2: Media Streaming Company
Before Optimization:
– High inter-region data transfer costs
– 400 TB monthly data transfer
– Origin shield not implemented
– Edge location selection suboptimal
– Manual monitoring only
After CloudFix Optimization:
– 60% reduction in inter-region costs
– Optimized edge location selection
– Origin shield implemented
– Automated monitoring and alerting
– Predictive scaling
Savings: $32,000/month (42% reduction)
Implementation and Onboarding
Simple 3-Step Setup:
- Connect CloudFix: Grant CloudFix read-only access to your AWS account
- Initial Analysis: Our AI analyzes your current CloudFront configuration within 24 hours
- Automated Implementation: CloudFix implements optimizations with your approval
Zero Downtime Guarantee:
– All optimizations tested in staging first
– Rollback capabilities for every change
– Gradual rollout for major changes
– 24/7 monitoring and alerting
Security and Compliance:
– AWS IAM best practices
– SOC 2 Type II certified
– GDPR compliant
– Regular security audits
Monitoring and Reporting
Real-Time Dashboard:
– Current cache hit ratios
– Cost savings tracking
– Performance metrics
– Optimization recommendations
Detailed Reports:
– Monthly cost optimization reports
– Performance improvement analysis
– ROI calculations
– Forecast savings
Alert System:
– Anomaly detection alerts
– Performance degradation notifications
– Cost spike warnings
– Optimization opportunity alerts
Pricing and ROI
CloudFix CloudFront Optimization Pricing:
– 15% of monthly savings with minimum $500/month
– No setup fees or long-term contracts
– Cancel anytime with 30-day notice
Expected ROI:
– Average customers see 25-40% cost reduction
– Typical payback period: 1-2 months
– 200-400% annual ROI
Risk-Free Guarantee:
– No savings, no fees
– 30-day money-back guarantee
– Dedicated success manager
– 24/7 customer support
Start Saving with CloudFront Optimization Today
CloudFront optimization isn’t just about compression – it’s about strategic origin selection, smart caching policies, and eliminating inter-region data transfer costs. One media company reduced their CloudFront bill by $27,000/month (60%) by implementing our recommended changes.
Ready to see your CloudFront savings potential?
Calculate your CloudFront optimization savings →
Getting Started
Ready to optimize your CloudFront costs?
- Free CloudFront Cost Assessment
- Get a detailed analysis of your current costs
- Identify optimization opportunities
-
Predict potential savings
-
Free Trial
- 14-day free trial
- $0 commitment
-
Full functionality included
-
Dedicated Onboarding
- Personalized setup consultation
- Custom optimization strategy
- Ongoing support and guidance
Get Your Free CloudFront Assessment
Learn More About CloudFix Optimization
Conclusion: Complete CloudFront Cost Optimization
CloudFront cost optimization goes far beyond basic compression. By understanding the complete pricing model, optimizing cache policies, choosing the right origins, and reducing inter-region data transfer costs, you can achieve significant savings.
Key Takeaways:
1. AWS origins (S3/ALB) are free – avoid custom origins when possible
2. Cache policies matter most – a 20% improvement in hit ratio can save thousands
3. Inter-region costs add up – CloudFront eliminates these for user traffic
4. Automation is key – manual optimization can’t keep up with changing traffic
CloudFix makes CloudFront optimization simple and automatic. Our AI-powered platform continuously monitors and optimizes your CloudFront configuration, delivering guaranteed savings without the manual effort.
CloudFront Optimization Results:
– Media company: $27,000/month savings (60% reduction)
– E-commerce platform: $15,000/month savings
– Overall average: 25-40% cost reduction across customers
Ready to maximize your CloudFront savings? Start with a free assessment today and see how much you could be saving.
Explore More High-Converting AWS Optimization Guides
Looking to optimize other areas of your AWS environment? Our readers love these guides:
– Cutting AWS Costs: EBS Volume Snapshot Archiving – How one client saved 27% on storage costs
– DynamoDB Standard vs IA: Cost Optimization – Choose the right capacity model
– AWS Reserved Instance Policy Changes – Navigate 2026 billing updates
Related Articles
-
<
- AWS Cost Optimization: The Complete Guide to Lowering Your Cloud Bill (2026)
- AWS Cost Optimization Tools: The Complete Comparison Guide (2026)
- CloudFix Finder/Fixer: CloudFront Turn on Compression
- CloudFix Feature: Delete Idle Elastic Load Balancers
li>CloudFix Finder: Delete Idle SageMaker Endpoints (Manual Fix)