Delete idle volumes to save 10% or more on Amazon Elastic File System (EFS)


The easiest way to save money on the cloud is to not use it at all.
– Meredith Holborn, AWS Technical Account Manager and AWS Made Easy guest
Obviously the quote above, from one of our favorite guests on the AWS Made Easy livestream, is tongue in cheek. Team CloudFix, of all people, would be the last to recommend that anyone NOT use the cloud! We wholeheartedly agree, however, with Meredith’s point: the easiest way to save money on AWS is to use less of it. That doesn’t mean scale back where it counts – it means stop paying for what you’re not using.
We’ve been down this road before, eliminating unnecessary EBS volumes, idle QuickSight users, unused Elastic IP addresses, idle Elastic Load Balancers and more. Today, we’ll do the same for Amazon Elastic File System (EFS) volumes, and reduce your EFS costs by 10% along the way.
Table of contents
- How Amazon Elastic File System (EFS) compares to other AWS storage options
- How to save 11% on EFS by using the backup storage tier
- How to find idle EFS file systems
- How to remove idle EFS volumes
- Remove idle EFS volumes automatically with CloudFix
1. How Amazon Elastic File System (EFS) compares to other AWS storage options
Amazon Elastic File System (EFS) is a managed Network File System v4 (NFS) service. It’s accessible by multiple AWS services, such as EC2 and Lambda, simultaneously. This allows EFS to act as a common data store for an application, using files as a basis of communication. Although EFS tends to be more expensive than options like S3 or EBS, it’s a great choice if you have an existing application that needs a big disk drive and you don’t want to rework it to use Amazon’s native tools.
As usual with AWS, there is more than one way to do things. EFS, defined in the simplest possible terms, is a way to store files where multiple users can access them simultaneously. There are other ways to do this with AWS. The ones that come to mind are S3 (especially with the new Mountpoint for Amazon S3 feature), sharing an EBS volume over NFS via an EC2 instance, modifying the code to work on data objects rather than files and then using DynamoDB, and even more exotic options such as hosted HDFS on an Amazon EMR cluster (this is overkill. Don’t use this if you don’t know what it is). Each of these options has different prices and different tradeoffs.
Relative to S3, EFS offers a hosted network file system that’s supported natively by nearly all operating systems. Rather than interacting with S3 via an AWS-supplied library, EFS file systems simply appear as a mounted network drive. This can simplify application development and make it easy to “lift and shift” applications to AWS without making drastic code changes. This simplicity does come at a cost, as EFS is more expensive on a per-GB basis than S3.
Compared to EBS, EFS offers access to multiple clients simultaneously. Multiple lambda functions, EC2 instances, and ECS clusters can all access the same EFS file system at the same time. Since EFS is an implementation of the Network File System, it is explicitly designed for this use case. EBS is block-level storage, designed to emulate a raw storage device attached to a particular EC2 instance. To get this feature using EBS, you would have to host your own NFS server using EC2, which is way too much complexity.
EFS can be a very flexible option when it meets your requirements and can act as a key part of your infrastructure. But eventually that infrastructure is no longer needed, and we end up with EFS volumes that aren’t being used by anyone. Since EFS volumes are often a shared resource (multiple data scientists accessing the same data set, for example), people are hesitant to delete EFS volumes because they aren’t sure if anyone else still needs it. Eventually, the unused volumes add up.
That’s where we come in. By identifying and removing idle volumes, while still retaining backups of each one, we can significantly lower EFS costs without risking the loss of any data.
2. Using the AWS Backup of EFS Volume storage tier to save 11% on EFS
Let’s start by taking a look at EFS pricing. It’s relatively straightforward:
|
Storage mechanism |
Cost per GB per month |
|
EFS Standard |
$0.30 |
|
EFS Standard-IA |
$0.025 |
|
EFS Average effective rate when using Intelligent-Tiering |
$0.08 |
|
$0.01 |
The first row, EFS Standard, is the price of a “standard” EFS volume. EFS volumes by default are created with this storage class. Similar to S3, there is a lower tier of access called Standard Infrequent Access (Standard-IA), which costs substantially less. There are also savings available by reducing the availability of the volume to a single availability zone within a region.
As you can see, EFS also has an Intelligent-Tiering option, like S3. In fact, we wrote a whole blog post about how to enable EFS Intelligent-Tiering across your organization, so if you haven’t done that, it’s a good place to start. In the pricing chart, the EFS “average effective rate when using Intelligent-Tiering” refers to the average EFS per-GB cost when using Intelligent-Tiering, which would be a mix of Standard and Standard-IA based on usage.
Which brings us to the final row, where we find our savings. AWS Backup of EFS volume refers to the cost of backing up the EFS volume. When we eliminate idle EFS volumes using the process below (or automatically with CloudFix), we use AWS Backup to save the data on the volume before deleting it. This lets us pay far less than EFS Standard and 1/8th the price of the Intelligent-Tiering effective rate, without risking that the data is gone forever. The result: an average of 11% savings on EFS. Not too shabby.
3. How to find idle EFS file systems
We’ve seen how much we can save by leveraging the AWS Backup tier for unnecessary volumes. Next, let’s find the EFS volumes that are good candidates for deletion. This involves two steps: defining what “idle” means in the context of EFS and then applying that definition to our AWS account.
3.1. Define “idle” for EFS volumes
We all know what “idle” means in a general sense, but it’s important to put guardrails around its definition when applied specifically to your application. We came up with our criteria after working with tens of thousands of accounts, but of course, you can always create your own.
Here’s how we do it. First, assume that “idle” means that there are no users of the file system. Taking that further, we think about how long a resource needs to be unused in order to be considered idle. We’ve found 30 days to be a reasonable amount of time. If you have an EFS volume whose only job is to store quarterly batch processes, then adjust accordingly.
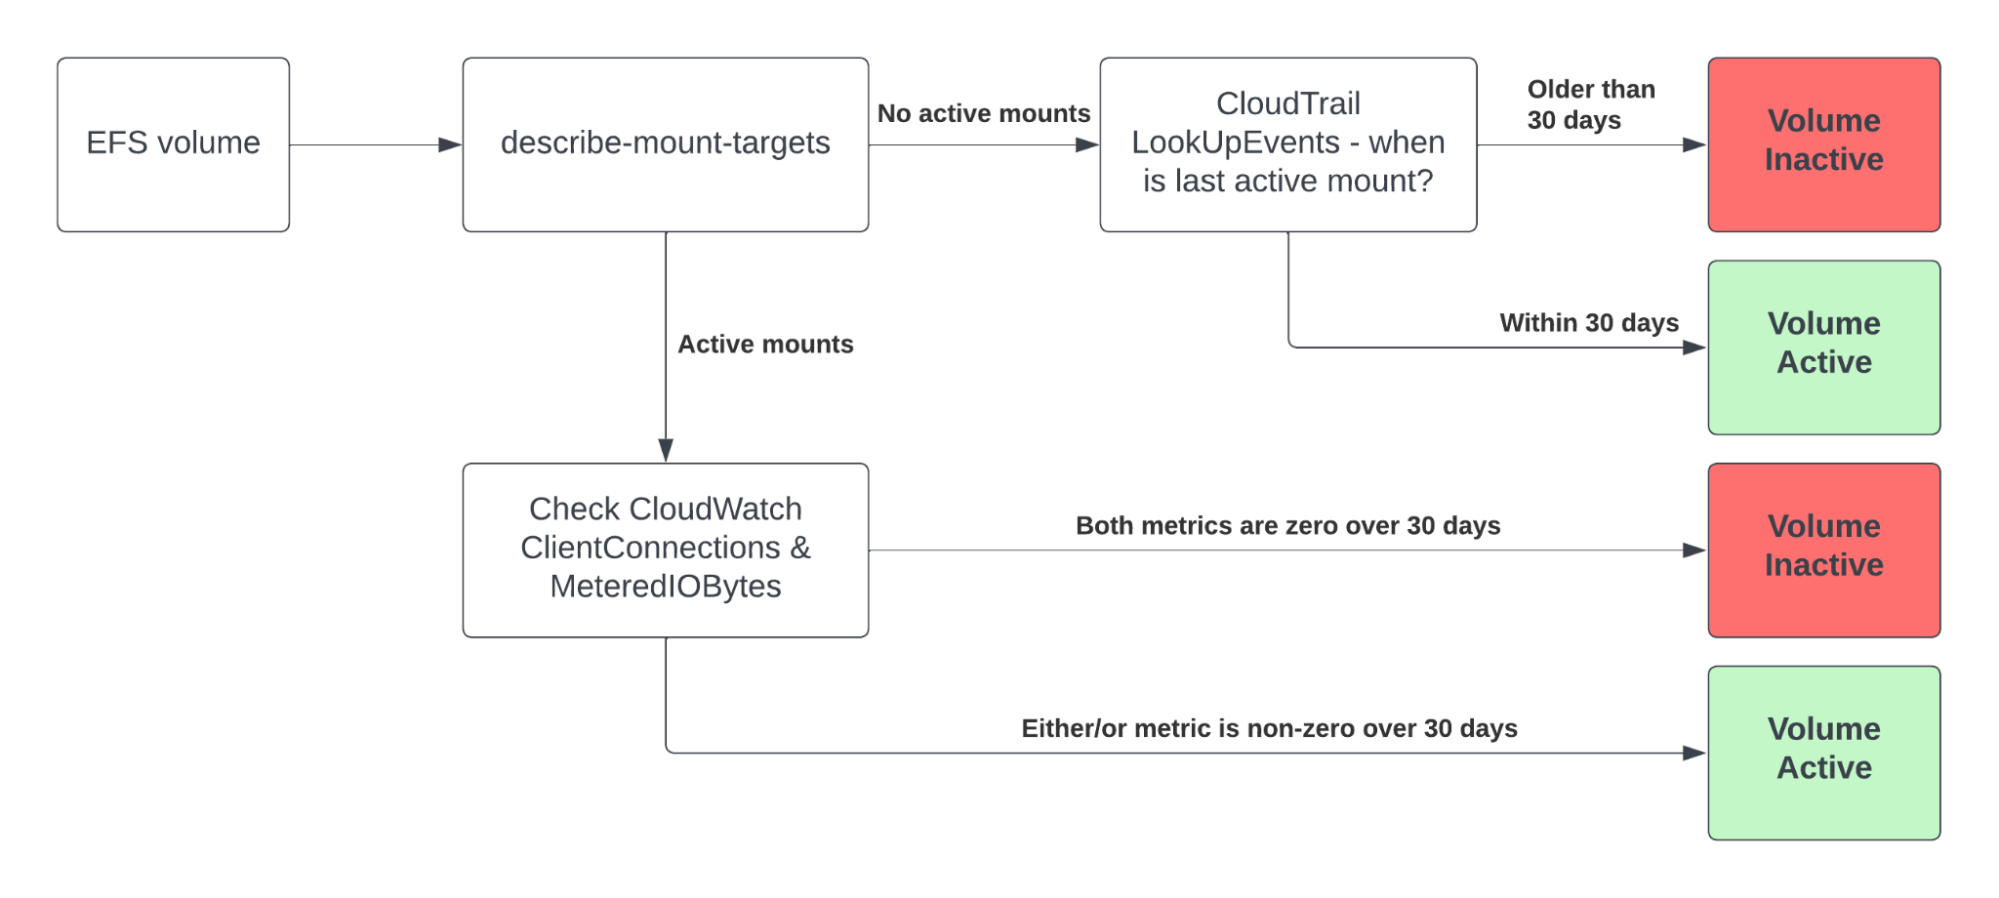
So, “idle” means no usage for more than 30 days – which means we need a way to determine that there was no usage over a period of time. The easiest way to check this is if there are no “active mounts.” This can be done using the describe-mount-targets EFS API. If describe-mount-targets returns an empty list, then there are no current users of the EFS volume.
However, it could be possible that the EFS volume was recently used and detached. So, even if there are no active mounts, we need to check CloudTrail using the LookUpEvents API to make sure that the last active mount command was more than 30 days ago.
If descibe-mount-targets returns a list of active mounts, the volume is still not necessarily active. This is where CloudWatch comes in (for more on CloudWatch, which is one of our favorite AWS tools, go here.) EFS is well monitored by CloudWatch and we can use it to delve into the details.
The statistics that we want to check to determine idleness are ClientConnections and MeteredIOBytes.
According to the EFS metrics page:
ClientConnections– The number of client connections to a file system. When using a standard client, there is one connection per mounted Amazon EC2 instance.MeteredIOBytes– The number of metered bytes for each file system operation, including data read, data write, and metadata operations, with read operations metered at one-third the rate of other operations.
If the sum of both of these metrics is zero over a 30 day period, we can consider the EFS volume in question to be idle. It would be like having a Netflix subscription, but having not watched any movies or shows in the past 30 days. In both cases, that’s a waste of money.
For my fellow visual learners, here’s what that process looks like in a flowchart:
3.2. Identify idle EFS volumes with AWS tools
To run this process, we can use a variety of AWS tools to tackle each step.
First, use the Cost and Usage Report (CUR) to get a list of resources.
SELECT
   line_item_usage_account_id AS account_id,
   product_region AS region,
   line_item_resource_id AS resource_id,
   sum(pricing_public_on_demand_cost) * 12 as public_cost,
   max(resource_tags_user_name) as name
FROM YOUR_CUR_TABLE
WHERE
      product_product_name <> 'AWS Premium Support'
      AND line_item_usage_start_date >= date_trunc('day', current_date - interval '31' day)
      AND line_item_usage_start_date <= date_trunc('day', current_date - interval '1' day)
      AND line_item_resource_id like 'arn:aws:elasticfilesystem:%'
GROUP BY 1,2,3;
The output of this query will have the following format:
|
account_id |
region |
resource_id |
public_cost |
name |
|
123456789012 |
us-east-1 |
arn:aws:elasticfilesystem:us-east-1:123456789012:file-system/fs-1a2b3c4d |
1200.00 |
User1 |
|
234567890123 |
us-west-2 |
arn:aws:elasticfilesystem:us-west-2:234567890123:file-system/fs-2b3c4d5e |
680.00 |
User2 |
|
345678901234 |
eu-west-1 |
arn:aws:elasticfilesystem:eu-west-1:345678901234:file-system/fs-3c4d5e6f |
400.00 |
User3 |
Note that in this query, you’ll see an approximation of the cost of the EFS volume on an annualized basis by simply multiplying the monthly cost by 12. This may be useful in prioritizing which EFS volumes to target. Looking at the resource_id for EFS volumes, they have the following format:
arn:aws:elasticfilesystem:${Region}:${Account}:${ResourceType}/${ResourcePath}We will use the ResourcePath in the upcoming sections to take the next steps in the flowchart.
3.3. Check for active mounts
For each EFS volume, use the describe-mount-targets command on the EFS resource path. For example, to query the first filesystem in the table:
aws efs describe-mount-targets --file-system-id fs-1a2b3c4dIf there is an active mount, the output will look like this:
{
    "MountTargets": [
        {
            "OwnerId": "123456789012",
            "MountTargetId": "fsmt-01234567",
            "FileSystemId": "fs-01234567",
            "SubnetId": "subnet-0abcd1234efgh5678",
            "LifeCycleState": "available",
            "IpAddress": "192.0.2.0",
            "NetworkInterfaceId": "eni-1a2b3c4d"
        }
    ]
}
Notice the LifeCycleState in the response. It will be available if this mount is active. The other values are creating, updating, deleting, deleted, and error. See the Mount Target Description documentation for more information on this response object.
If there are no active mounts, the command will simply return the empty list.
{
    "MountTargets": []
}
3.4. Use CloudTrail LookUpEvents API to find the most recent active mount
Recalling the flowchart, if there are no active mounts, we still want to make sure the last time an active mount was deleted was more than 30 days ago. Otherwise, this EFS volume would have been in recent use and would not be considered “idle.” The command to do this is:
aws cloudtrail lookup-events \
    --lookup-attributes AttributeKey=ResourceArn,AttributeValue=arn:aws:elasticfilesystem:us-east-1:123456789012:file-system/fs-1a2b3c4d \
    --max-items 1 \
    --query 'sort_by(Events,&EventTime)[?EventName==`DeleteMountTarget`] | [-1]'
Note in the query that we are looking for the DeleteMountTarget event, and that it sorts by the most recent one. The output of the command will look like:
{
   "EventId":"0123456d-a123-45b6-7c89-d8e9f0abc1d2",
   "EventName":"DeleteMountTarget",
   "ReadOnly":false,
   "AccessKeyId":"ASIAIOSFODNN7EXAMPLE",
   "EventTime":"2022-07-21T09:47:02Z",
   "EventSource":"elasticfilesystem.amazonaws.com",
   "Username":"iam_username",
   "Resources":[
      {
         "ARN":"arn:aws:elasticfilesystem:us-east-1:123456789012:file-system/fs-1a2b3c4d",
         "AccountID":"123456789012",
         "Type":"AWS::EFS::MountTarget"
      }
   ],
   // ...
}
Check the EventTime to see if it’s within the past 30 days. If so, that volume has been used recently and isn’t a good candidate for removal.
3.5. Use CloudWatch to check the true idleness of EFS volumes with active mounts
If you find an EFS volume with active mounts, it can still be idle. To check if it is, we need to look at the ClientConnections and MeteredIOBytes metrics.
A sample command to do this is:
aws cloudwatch get-metric-statistics \
    --namespace AWS/EFS \
    --metric-name ClientConnections \
    --dimensions Name=FileSystemId,Value=fs-1a2b3c4d \
    --start-time 2023-07-15T00:00:00Z \
    --end-time 2023-08-14T00:00:00Z \
    --statistics Sum \
    --period 2592000 \
    --region us-east-1
If there is zero for this statistic, the output would look like:
{
    "Label": "ClientConnections",
    "Datapoints": [
        {
            "Timestamp": "2023-07-15T00:00:00Z",
            "Sum": 0.0,
            "Unit": "Count"
        }
    ]
}
The same approach can be done for the MeteredIOBytes metric, simply changing the metric-name. If both metrics are zero, great: that volume can be deleted. If either or both is not zero, it’s worth keeping around.
Let’s sum this up. We consider an EFS volume idle if it hasn’t been used in 30 days. We can determine that by seeing if the volume either has no active mounts or has active mounts that have no connections and haven’t moved any data. To double check, we can use the EFS APIs, along with CloudWatch and CloudTrail, to evaluate each EFS volume and see if it’s truly idle or not.
4. How to remove idle EFS volumes
Now comes the (relatively) easy part: backing up and eliminating the volumes that we no longer need – and don’t want to pay for. This is a four-step process:
- Create a backup vault
- Delete active mounts
- Start a backup job
- Use the EFS DeleteFileSystem API to remove the EFS volume
4.1. Create a backup vault
AWS Backup is a “fully-managed service that makes it easy to centralize and automate data protection across AWS services, in the cloud, and on premises.” We can use AWS Backup to save the data from an EFS volume at the cost of $0.01/GB/month. This is a drastic reduction from the $0.30/GB/month rate for standard EFS, and is still far cheaper than $0.08/GB/month when using EFS Intelligent-Tiering.
AWS Backup uses the concept of a “Backup Vault,” which is a logical container for backups. The entities within a vault share a common encryption scheme using AWS KMS. Backup vaults are specific to a region, so make sure to create one for each region as necessary. Finally, each region will have a default vault named default, but it is good practice to create one specifically for that region.
To create a backup vault for a particular region, use the following command:
aws backup create-backup-vault \
    --backup-vault-name auto-efs-backups \
    --region us-east-1
4.2. Delete active mounts
In preparation for deleting the EFS volume, we need to delete the active mounts. Recall the command for listing the mount targets:
aws efs describe-mount-targets --file-system-id fs-1a2b3c4dThis will return a list of Mount Target Description objects. Each Mount Target is identified by a MountTargetId, and is “active” if the LifeCycleState attribute is available. For each Mount Target which is available, issue the following delete-mount-target command, substituting in the MountTargetId:
aws efs delete-mount-target --mount-target-id <mount-target-id>4.3. Start a backup job
Creating a backup of an EFS volume to a backup vault can be done on demand or on a schedule. In this case, we’re doing the backup on demand. This can be done in the AWS console or the CLI.
Use the following command, being sure to substitute in the backup-vault-name that you created two steps ago and the correct resource ARN. Make sure that the credentials you’re using can utilize AWS Backup as well. By default, running the start-backup-job command invokes an IAM role called AWSServiceRoleForBackup, which should be fine. If necessary, you can specify a custom IAM role on the command line.
aws backup start-backup-job \
    --backup-vault-name auto-efs-backups \
    --resource-arn arn:aws:elasticfilesystem:us-east-1:123456789012:file-system/fs-1a2b3c4d
The output of the command will look like:
{
    "BackupJobId": "abcd1234-a123-456a-a12b-a123b4cd5e6f",
    "RecoveryPointArn": "arn:aws:backup:us-east-1:123456789012:recovery-point:abcd1234-a123-456a-a12b-a123b4cd5e6f",
    "CreationDate": "2022-03-25T20:20:25.756000-07:00"
}
Take note of the BackupJobId, as we need that to check the status of the job. You can also attach tags to the recovery point. This is done with the --recovery-point-tags option. You may want to save any metadata about the automation process here.
To check on the status of a backup job, use the describe-backup-job command. This takes the BackupJobId as input and returns a BackupJob object. The key thing to look for is the State, which should be COMPLETED if everything worked correctly. Keep checking on the status of the backup job and wait until it’s complete before proceeding to the next and final step: removing the EFS volume (finally!)
4.4. Use the EFS DeleteFileSystem API to remove the EFS volume
We made it! After finding the EFS volumes, determining if they’re idle, and creating and verifying backups, it’s time to delete the volume. This step is always anticlimactically simple. The command, delete-file-system, takes as input a file system ID and will initiate the deletion process.
aws efs delete-file-system --file-system-id fs-1a2b3c4dOnce the deletion is done (you can check this with the describe-file-systems command to see if the LifeCycleState is deleted), the process is complete. Congratulations: you just went from paying $0.30/GB/month to $0.01/GB/month without any loss of data.
5. Remove idle EFS volumes automatically with CloudFix
We built CloudFix to take care of the simple, risk-free fixes that, at scale, add up to serious AWS savings. Many of those, like this fix, delete idle resources. While the automation is pretty straight forward, there are a number of steps and it involves deleting things, so you want to be certain it’s a process you can trust. We have run and tested this automation across tens of thousands of accounts and have made sure that you can realize these savings without losing data. That means you can focus on adding value to your business while we take care of the cleaning up.
Whether you use CloudFix or write your own automation, you can definitely save money by eliminating idle EFS volumes. So go forth and delete – the easiest way to save money on the cloud, after all, is by not using it at all.
Related Articles
-
<
- AWS Cost Optimization: The Complete Guide to Lowering Your Cloud Bill (2026)
- AWS Cost Optimization Tools: The Complete Comparison Guide (2026)
- GP3 vs IO2: Up to 87% Cheaper — Real AWS Pricing Benchmarks (2026)
- GP2 vs GP3 AWS: 20% Cheaper, Faster IOPS — Full Cost Comparison
li>DynamoDB Standard-IA: Save 60% on Storage Costs (2026 Guide)