Scale equals savings when you remove idle Elastic Load Balancers

Take care of your pennies and your dollars will take care of themselves.
– Scottish proverb
When you think of Scotland, many references come to mind. Macbeth, Braveheart, Outlander (in order of decreasing artistic quality). Bagpipes, kilts, whisky. A certain mysterious loch-bound creature. An instantly recognizable accent. But how about age-old financial wisdom?
Turns out that ancestral Scots were wise in the ways of money. Their proverb – “Take care of your pennies and your dollars will take care of themselves” – is really the foundation of our approach to AWS cost optimization. We’ve talked about this before (unused Elastic IP addresses, idle QuickSight users, unnecessary EBS volumes) and today’s fix is another great example. By cleaning up idle Elastic Load Balancers, you can achieve significant AWS cost savings. Let’s dig in. (But not to haggis. Never to haggis.)

Freedom… from paying too much for Elastic Load Balancers
Table of Contents
- A brief background of idle Elastic Load Balancers
- How to define and identify idle Elastic Load Balancers
- The long route to removing unnecessary Elastic Load Balancers
- Find and delete idle Elastic Load Balancers automatically with CloudFix
A brief background of idle Elastic Load Balancers
With AWS, it’s easy to spin up resources and get the job done – and just as easy to let those resources sit there, accumulating costs, once they’re no longer needed.
Case in point: Elastic Load Balancers (ELBs). Teams typically turn to ELBs when there is more load than can be handled by a single resource, like an EC2 instance. Elastic Load Balancers can distribute the load at an application, network, or gateway level.
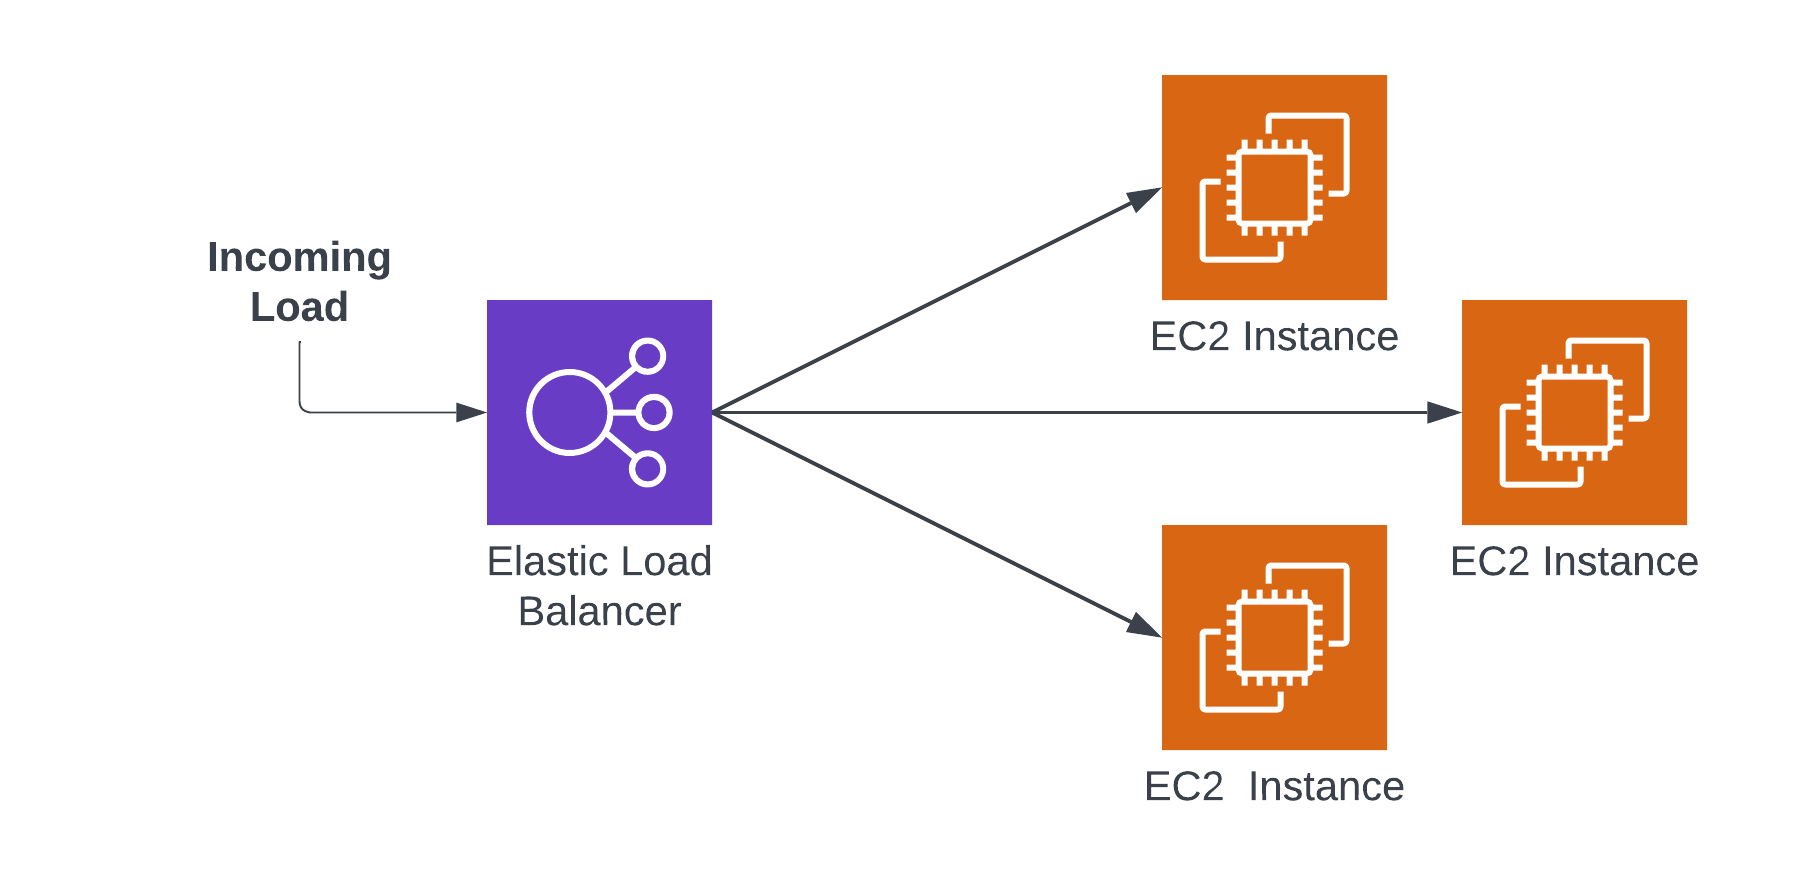
You can see the one-to-many relationship between ELBs and other resources, such as EC2 Instances, in the Elastic Load Balancer logo:

A typical configuration of an ELB and EC2 instances
Idle ELBs turn up when developers turn off the EC2 instances (which, to be fair, are the lion’s share of the cost) without turning off the Elastic Load Balancer. It’s easy to understand how this happens. As a developer makes an application, it can initially be hosted with one instance, but as traffic grows, the developer changes to an ELB + several EC2 configuration. Once the application has been used, the developer turns off the instances and forgets about the ELB.
Elastic Load Balancers seem inexpensive. They’re priced at up to $0.0225/hr, or ~$200/yr. Compared to EC2s or other load bearing resources, that’s peanuts. However, like Elastic IP addresses, ELBs can accumulate over time – and picking up those peanuts can result in substantial AWS cost savings. In fact, one study of a large organization revealed $101K in unused ELBs. Peanuts no more.
You know the drill: let’s look at how you can manually eliminate both types of ELBs (not fun), and how CloudFix can do it for you quickly and easily.
How to define and identify idle Elastic Load Balancers
Elastic Load Balancers come in two different flavors: Classic and v2. There are a handful of differences (v2 includes subtypes like Application Load Balancers, Network Load Balancers, and Gateway Load Balancers, for one), but one big similarity: if it’s an unused Elastic Load Balancer of any type, it makes no sense to pay for it. So, for the sake of this fix, let’s just call them all ELBs.
(Side note: the two types of Elastic Load Balancers are relevant to our discussion because they require two separate processes to eliminate idle ELBs manually, making the process even more arduous than usual. More on that in a minute.)
How do you define an idle Elastic Load Balancer? In our humble opinion, a good definition of idle in the context of ELBs is “having not distributed any traffic for more than 90 days.” Here’s how we got there: the most infrequent load that makes sense to support would be quarterly. (Admittedly, if there’s a resource that is idle for 89 days and then requires an ELB on the 90th day, there’s a bigger design problem than just ELBs, but let’s not go down that rabbit hole.) Let’s just assume that an idle Elastic Load Balancer is one that has not routed any traffic for more than 90 days.
Next question: how do you find the idle Elastic Load Balancers? Like most of these finder/fixer combinations, it requires merging multiple data sources.
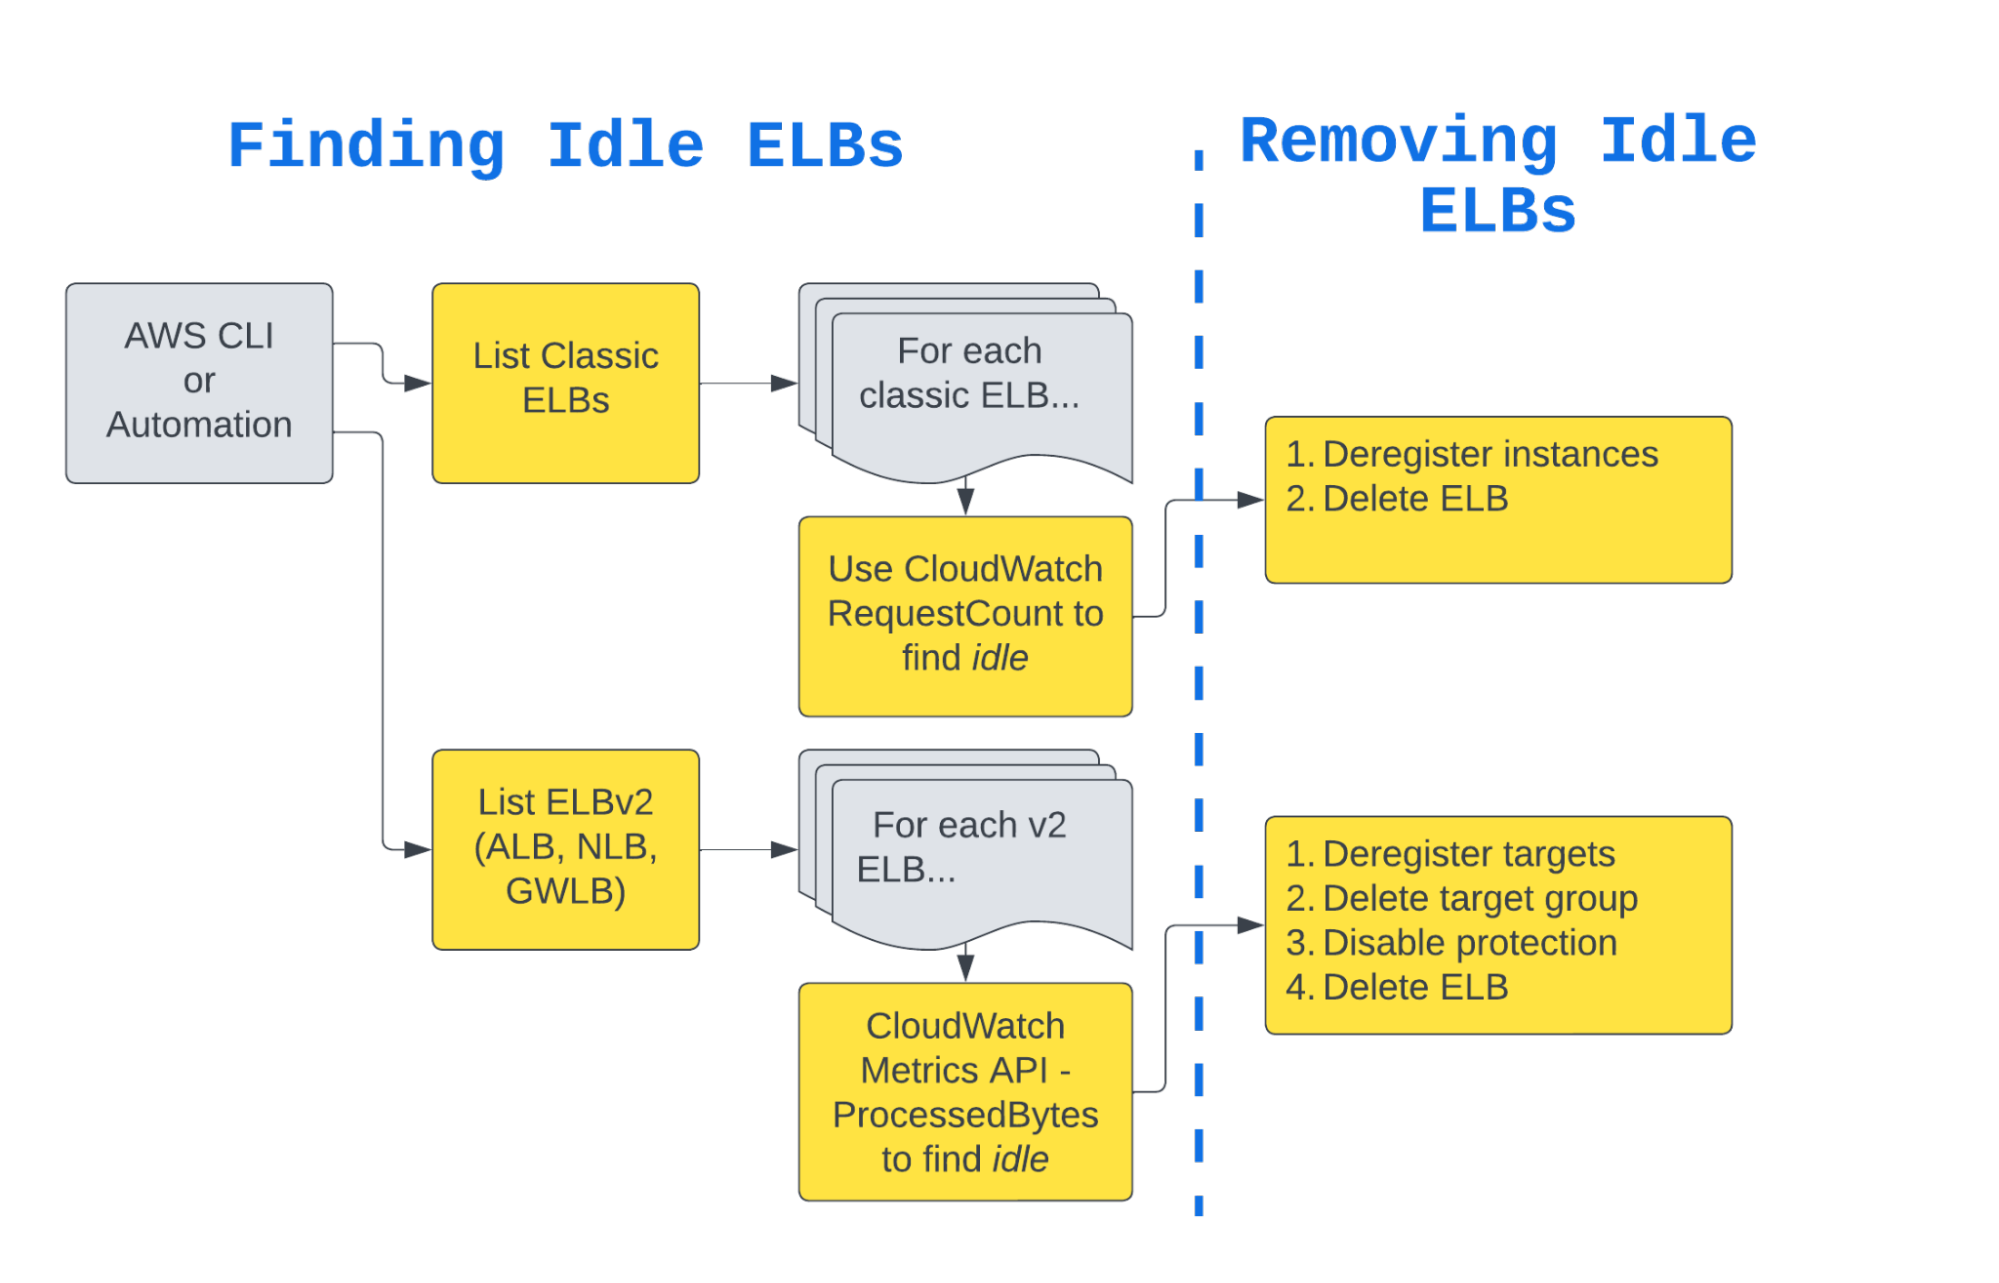
The first step is to identify all of the ELBs, idle and otherwise. Since there are two versions, we need to use two different commands from the AWS CLI to identify them. To find Classic ELBs, use the following command:
aws elb describe-load-balancersFor the v2 ELBs, use this command:
aws elbv2 describe-load-balancers
The commands both return a JSON list of resources. The elbv2 command output will look like:
{
  "LoadBalancers": [
    {
      "LoadBalancerArn": "arn:aws:elasticloadbalancing:us-west-2:123456789012:loadbalancer/app/my-load-balancer/50dc6c495c0c9188",
      "DNSName": "my-load-balancer-424835706.us-west-2.elb.amazonaws.com",
      "CanonicalHostedZoneId": "Z2P70J7EXAMPLE",
      "CreatedTime": "2023-04-02T05:15:29.540Z",
      "LoadBalancerName": "my-load-balancer",
      "Scheme": "internet-facing",
      "VpcId": "vpc-3ac0fb5f",
      "State": {
        "Code": "active"
      },
      "Type": "application",
      // …. more information
  ]
}
The elb command output has a very similar structure:
{
  "LoadBalancerDescriptions": [
    {
      "LoadBalancerName": "my-classic-loadbalancer",
      "DNSName": "my-classic-loadbalancer-1234567890.us-west-2.elb.amazonaws.com",
      "CanonicalHostedZoneName": "my-classic-loadbalancer-1234567890.us-west-2.elb.amazonaws.com",
      "CanonicalHostedZoneNameID": "Z3DZXD0Q5NVJ8",
      // …. More information
    }
  ]
}
The key thing is being able to uniquely identify the ELBs so we can separate out the idle ones.
Warning:
We usually refer to most resources by their Amazon Resource Name, or ARN. For example, ELBv2’s have the LoadBalancerArn field. However, Classic ELBs predate ARNs, so to uniquely identify a Classic ELB, use the DNSName field. You can also use a combination of LoadBalancerName and region. Importantly, the LoadBalancerName field of a Classic ELB does not uniquely identify it. In other words, multiple regions can have a classic ELB named “my-classic-elb.”
If you are using the AWS CLI, you can leverage the excellent JSON filtering tool jq to make it easy to extract just the DNSName / LoadBalancerArn fields. Once you have issued the commands above, you should have a list of all of the ELBs.

How to find and remove idle Elastic Load Balancers
This process identifies all of the ELBs. Next, using our handy-dandy definition of “idle,” we can figure out which ELBs have not routed traffic for more than 90 days.
This too requires slightly different approaches for Classic and v2. The common part of the approach is that we can use CloudWatch to quantify the amount of traffic the ELBs have routed.
For a Classic ELB, issue the following command:
aws cloudwatch get-metric-statistics \
  --region us-west-2 \
  --namespace "AWS/ELB" \
  --metric-name "RequestCount" \
  --dimensions Name=LoadBalancerName,Value=my-classic-loadbalancer \
  --start-time "$(date -u -d '90 days ago' +%Y-%m-%dT%H:%M:%SZ)" \
  --end-time "$(date -u +%Y-%m-%dT%H:%M:%SZ)" \
  --period 86400 \
  --statistics "Sum"
This will return JSON output with the following structure:
{
  "Label": "RequestCount",
  "Datapoints": [
    {
      "Timestamp": "2023-01-03T00:00:00Z",
      "Sum": 24500.0,
      "Unit": "Count"
    },
    // ...
  ]
}
To see if the ELB in question is idle, check the Sum field values and make sure that they are 0.0 across the 90-day window. For a V2 ELB, such as an ALB, use the following command:
aws cloudwatch get-metric-statistics \
  --region us-west-2 \
  --namespace "AWS/ApplicationELB" \
  --metric-name "ProcessedBytes" \
  --dimensions Name=LoadBalancer,Value=my-elbv2-arn \
  --start-time "$(date -u -d '90 days ago' +%Y-%m-%dT%H:%M:%SZ)" \
  --end-time "$(date -u +%Y-%m-%dT%H:%M:%SZ)" \
  --period 86400 \
  --statistics "Sum"
Note that the ARN must be substituted with a v2 ARN, and that the namespace must be matched to the type of ELB; NLBs use AWS/NetworkELB and GWLBs use AWS/GatewayELB. We recommend using ProcessedBytes for v2 ELBs because it is available for all v2 ELB types. You can’t use it for Classic ELBs because it is not supported, but the RequestCount metric works just fine.
Now that you’re loaded with the information you need to find idle ELBs, let’s take the balance of the article to talk about how to eliminate them. (See what we did there? #DadJokes4Life)
The long route to removing unnecessary Elastic Load Balancers
Okay: it was a hassle, but you’ve successfully found all of your idle ELBs. Now it’s time to get rid of them.
Once again, we have to deal with the two-type situation. Your Classic ELBs are identified by a Name, Region pair, and the v2 ELBs by an ARN. Let’s go over the process for both types.
How to remove Classic ELBs
Classic ELBs work by distributing load at the network level to instances. To do this, instances must be registered with the ELB. Before ELBs can be deleted, the registered instances must be deregistered.
Recall the elb describe-load-balancers command from the previous section. Part of the return body of this command is an array of registered instances. This looks like:
{
  "LoadBalancerDescriptions": [
    {
      "LoadBalancerName": "my-classic-loadbalancer",
      "DNSName": "my-classic-loadbalancer-1234567890.us-west-2.elb.amazonaws.com",
      // other information
      "Instances": [
        {
          "InstanceId": "i-1234567890abcdef0"
        }
      ],
      // more information
    }
  ]
}
The highlighted section in the above output shows the list of registered instances. To deregister the associated instances, iterate over the members of the instances array and issue the following command:
aws elb deregister-instances-from-load-balancer \
  --load-balancer-name my-classic-loadbalancer \
  --instances i-1234567890abcdef0
Once this command is completed successfully for all instances, issue the following command:
aws elb delete-load-balancer \
  --region us-west-2 \
  --load-balancer-name my-classic-loadbalancer
This will delete the idle Classic ELB. Good times.
How to remove v2 ELBs
For v2 ELBs, the process is similar. However, rather than instances, the v2 ELBs distribute traffic to target groups, which contain individual targets. There are a couple of things that need to happen in order to remove a v2 ELB:
- List the target groups associated with the ELB
- For each target group, deregister each associated target
- Delete each target group
- Delete the ELB
Step 1: List the target groups
To list the target groups associated with an ELB, use the following command, substituting in the ARN of the ELB and also the correct region.
aws elbv2 describe-target-groups \
  --region REGION \
  --load-balancer-arn LOAD_BALANCER_ARN
This command will output an array of target groups, along with information about each group.
{
  "TargetGroups": [
    {
      "TargetGroupArn": "arn:aws:elasticloadbalancing:us-west-2:123456789012:targetgroup/my-target-group-1/abcdef123456",
      "TargetGroupName": "my-target-group-1",
      "TargetType": "instance",
      // …more target group information
    },
    // more target groups
  ]
}
Note that the Target Groups are identified by ARNs. Each entity in the TargetGroups list in the JSON above represents a TargetGroup, identified by a TargetGroupArn. Extract a list of TargetGroupArn’s, and proceed with steps 2 and 3 for each one.
Step 2: For each target group, deregister the targets
For each TargetGroupArn, you will want to deregister the targets. In order to do that, we need to first get a list of the targets, which we can do with this command:
aws elbv2 describe-target-health \
  --region us-west-2 \
  --target-group-arn TARGET_GROUP_ARN
This will output a list of the health of all targets, as well as their IDs.
{
  "TargetHealthDescriptions": [
    {
      "Target": {
        "Id": "i-1234567890abcdef0",
        "Port": 80
      },
      "TargetHealth": {
        "State": "healthy"
      }
    },
    {
      "Target": {
        "Id": "i-0987654321abcdef0",
        "Port": 80
      },
      "TargetHealth": {
        "State": "unhealthy",
        "Reason": "Target.ResponseCodeMismatch",
        "Description": "Health checks failed with these codes: [404]"
      }
    }
  ]
}
In the sample JSON above, the target IDs are i-1234567890abcdef0 and i-0987654321abcdef0, and you will need to deregister both of these targets to delete the Target Group. To deregister a list of targets in one command, extract your target IDs (which are probably instance ID’s) and insert them into following command.
aws elbv2 deregister-targets \
  --region us-west-2 \
  --target-group-arn TARGET_GROUP_ARN \
  --targets Id=INSTANCE_ID_1 Id=INSTANCE_ID_2
For our sample target group, the command would be:
aws elbv2 deregister-targets \
  --region us-west-2 \
  --target-group-arn arn:aws:elasticloadbalancing:us-west-2:123456789012:targetgroup/my-target-group-1/abcdef123456 \
  --targets Id=i-1234567890abcdef0 Id=i-0987654321abcdef0
Executing this command will deregister the targets from our sample target group.
Step 3: Delete each target group
Once we have deregistered the targets, we can finally delete the target group.
aws elbv2 delete-target-group \
  --region us-west-2 \
  --target-group-arn TARGET_GROUP_ARN
After steps 2 and 3 have been completed, the ELB intended for deletion in step 1 will have no associated target groups and can be deleted. You are almost there!
Step 4: Delete the ELB
Finally, you delete the ELB with the following command:
aws elbv2 delete-load-balancer \
  --region us-west-2 \
  --load-balancer-arn LOAD_BALANCER_ARN
Find and delete idle Elastic Load Balancers automatically with CloudFix
Phew. That was intense. We need a bagpipe break.
Clearly, the manual process of finding ELBs, identifying the idle ones, and removing them (across two types, nonetheless, with all the deregistering rigamarole) is complex and time consuming. Yes, it’s possible. No, it’s not a good use of your time. Heck no, you would never do it across each and every ELB, each and every month.
Instead, take care of your pennies with CloudFix. The CloudFix Cleanup Idle ELBs fixer automates the process of finding and removing both types of idle ELBs. It works over all of your accounts linked to your master payer account, automatically running the fix. While $200 savings per ELB is definitely not worth the engineering effort manually, those pennies add up at scale. And like all CloudFix fixers, it’s continuous, secure, and runs with zero service interruptions.
This week, we salute the wise old Scots who penned such a genius proverb. Get in touch to see how CloudFix makes it easy for your dollars to take care of themselves.


