Reduce Your Cloud Spend on Provisioned Solid State Drives using AWS gp3 EBS Volumes

AWS application workloads requiring high-throughput IOPS and/or low-latency often leverage io1/io2 EBS volumes. Similar to the benefits realized from migrating general purpose EBS volumes, you can also upgrade provisioned volumes to gp3 and reduce your cloud spend in the majority of use cases. In this article, we discuss when it makes sense to upgrade your io1/io2 volumes, how to do it yourself manually, and an alternative solution called CloudFix which automates this process at scale across your enterprise.
FinOps is an emerging field that can be overwhelming at first, but one that organizations of any size or scale simply can’t afford to ignore. Consider the process around inventory management of physical servers compared to today’s world where any number of people in your organization can create resources with a single mouse click. This agility comes with an additional cost. On the plus side, it is also easier to upgrade to faster, better technologies as well. The provisioned EBS volumes use case discussed here is a perfect example of that.
What are provisioned EBS volumes?
EBS volumes are disk drives attached to your EC2 instances. Their lifecycle is not tied to the instance, meaning they can persist beyond the shutdown of your virtual machines. Solid State Drive (SSD) EBS (Elastic Block Store) general purpose volumes work well with a variety of workloads, offering a good balance of price and performance. However, applications that have extremely high performance and/or throughput requirements (greater than 16,000 IOPS) generally use provisioned EBS volumes (io1 or io2).
Late last year, AWS announced the next-generation general purpose SSD volumes called gp3. These volumes deliver a better value without sacrificing performance. Notably, gp3 peak throughput rose to match that of io1/io2 at 1,000 MiB/s. The best part about all of this is that you can upgrade these volumes in place to immediately begin realizing the cost savings. No downtime is required in the vast majority of cases.
At CloudFix, we thoroughly tested this upgrade opportunity and strongly recommend migrating the majority of io1/io2 volumes with less than 16,000 provisioned IOPS to gp3. The performance numbers for all volume types can be found in the AWS documentation. There are a few caveats however that you want to consider first before migrating.
What to consider before migrating
There are a few cases where it may not be beneficial to migrate to gp2 volumes.
- Volumes with more than 16K of provisioned IOPS should remain on io1/io2. This is the max IOPS supported for gp3.
- Look at your EBS metrics to determine if your peak throughput ever exceeds the gp3 maximum of 1,000 MiB/s. If it does, or it is a requirement to be able to do so, do not migrate as this may impact your application performance.
- Some uncommon cases include older EC2 instances launched before November 2016 that require initialization of elastic attachments. Unfortunately, this step requires some downtime because you need to either detach/attach the volume or else stop/start the instance.
- Finally, short-lived volumes that are only around for a week or two may not be worth the effort.
Outside of these cases, you are likely to benefit from the move to gp3.
Migration Procedures
There are two migration approaches to consider. The first option is to conduct the migrations manually using the following procedure:
- Select the io1 or io2 volume in the AWS console
- Verify the volume was created after 3 November, 2016. Volumes created prior to this date require downtime to migrate.
- Verify the volume’s provisioned IOPS is 16,000 or less
- Verify the peak throughput is less than 1000 Mbps (Read Bytes Sum + Write Bytes Sum for each minutes should be less than 60000, i.e. 1000 x 60)
- If all these conditions are met, continue and use either the AWS console or CLI to modify the volume.
- Repeat these steps for each volume
The EC2 console allows you to make the modification to the volume. Select your desired EBS volume and choose the Modify action. You will see a dialog similar to one shown below. Change the drop down value to gp3 and click Modify.
Your volumes are migrated in place with no downtime. If you need to rollback, you can modify the property using the same technique to go back to io1/io2. As an extra precaution, we recommend taking a snapshot of the EBS volume before performing the migration.
Alternatively, you can use the EC2 CLI (or API) using the following command:
aws ec2 modify-volume --volume-id --volume-type gp3This approach can work for a small number of volumes, however it can be time consuming and error prone. The alternative is to sign up for a free CloudFix account and in a few minutes, setup, review, and save. This approach easily scales to large numbers of volumes resulting in optimal savings with minimal effort.
Automatic Migration at Scale
CloudFix automatically monitors your account, identifies migration opportunities, and safely modifies volumes with the click of a button. It also takes a backup snapshot before the migration as a best practice.
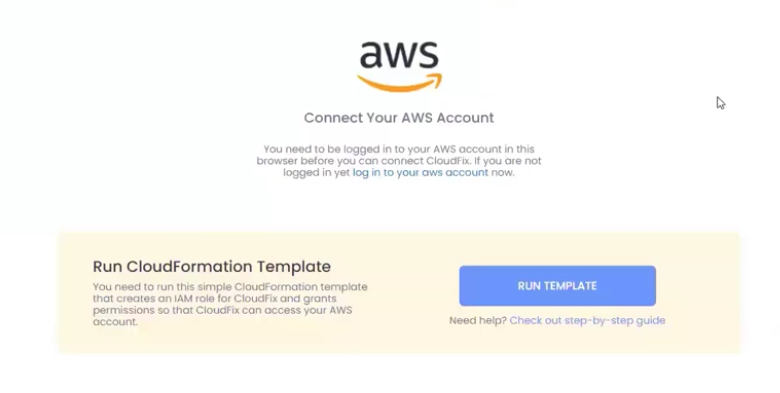
Browse to CloudFix and create a free account. Setup monitoring on your AWS account by clicking Run Template. This creates the IAM role used by CloudFix.

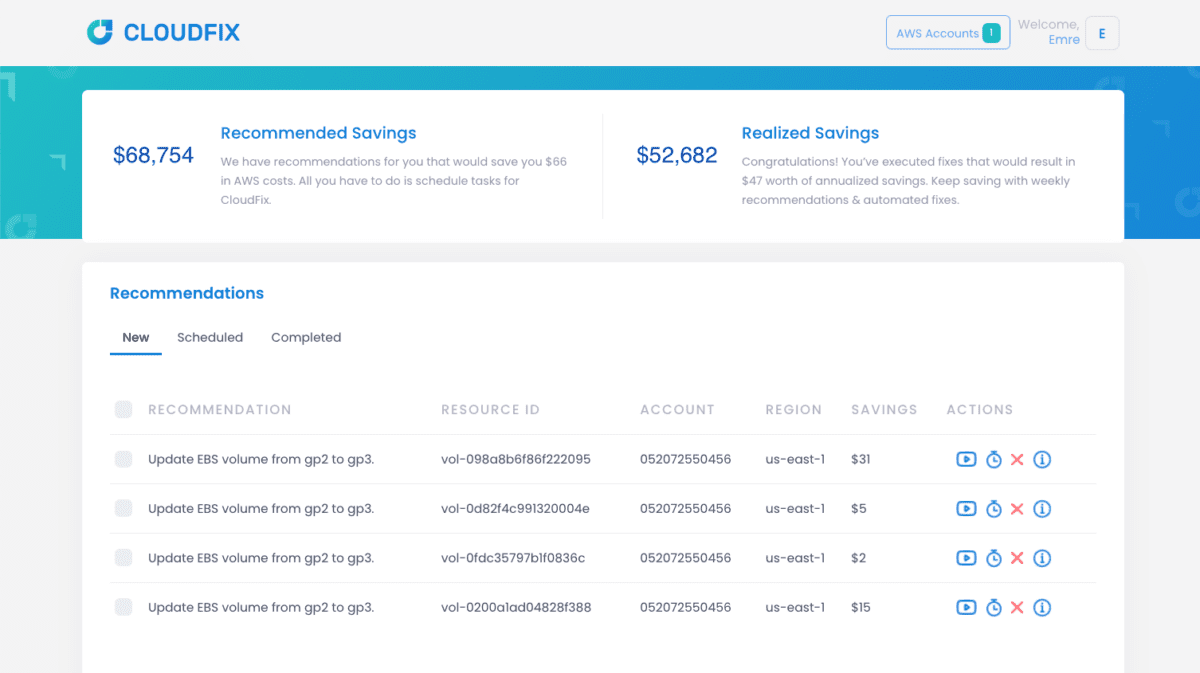
Review the recommendations on the dashboard and select one or more volumes to migrate. Click the Play button to perform the migrations now or the Schedule button to have CloudFix run them during a maintenance window. You can migrate selected volumes, or simply select all to apply all recommended migrations with one click.

You should give serious consideration to upgrading provisioned volumes where applicable based on the criteria discussed above. In the vast majority of cases, the migration will be beneficial in the end. Your FinOps career will also be off to a good start!


